There are several ways to load images into Gifcon. I find the easiest is to use the Animation Wizard to get the basic assembly done. Then you can edit it further if necessary.
Start with Animation Wizard
- Launch Gifcon; From the Menu select FILE|ANIMATION WIZARD. Follow the prompts.
- Do you want to create a GIF for use in a WWW page? Select yes.
- Looping? Only two choice - indefinitely or just once. If you want it to loop just a few times and stop, you can edit it later.
- Photorealistic, drawn...? If you're doing one of your first animations, select either Drawn or Photorealistic depending on your animation and click NEXT. For those who previously read the In-Depth discussion about gradient images and optimized palettes in the previous step, here's where you let Gifcon know what you want.
- If you have either drawn images or gradient images, all with web palettes, then select DRAWN. Gifcon will then use its web palette.
- If you have gradient images with optimized palettes and you created a composite gif, then select MATCH TO FIRST IMAGE, and make sure the first image you select is the composite gif. Later you can eliminate this image from your animation. If you already loaded the global optimized palette from the composite gif into all the images in the previous step, then you can select MATCH TO FIRST IMAGE and leave out the composite gif here.
- If you have photorealistic images, select PHOTOREALISTIC. If you already dithered it to the web palette in the last step, Gifcon will just load them in unchanged. If you didn't, Gifcon will do all the work for you now.
- How much delay do you want? 100 equals 1 second, 50 equals 1/2 second, etc. If you don't like these choices or if you want different delays for some images, select the most common one here and we can edit the others later.
- Select files. If you named your files with a sequential numbering scheme, you can select them all at once using Shift-click or CTRL-click. You can import most popular file formats including BMP, GIF, JPG, PCX, etc.
- When you're done the file will be opened in Gifcon and will look something like this for the bouncing ball animation.
You now have a working animation. You can view it by selecting VIEW from the Gifcon toolbar or you can view it in Netscape by selecting from the FILE menu OPEN FILE and selecting the animation file. For non-looping animations, reload the page to replay the animation.
Now is a good time to save your animation; from the menu select FILE|SAVE AS.
If this is one of your first animations and you don't want to edit it. then Fast Forward to the next step. But if you are ready to learn how to manually edit animations, here are some suggestions.
Fast Forward >>
V In-Depth V
Edit the animation if necessary
Animation Wizard produces a working animation which often needs no editing. But after viewing your animation, you may want to edit the images by deleting, modifing or adding some additional ones. Or you may want to fine tune the settings such as the timing, looping, or transparency of your animation.
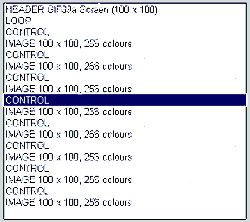
An animation file contains the images plus 3 types of settings;
| - Global animation settings that affect the entire animation |
| - Image setting specific to each image |
| - Optional comments |
In Gifcon, the images and settings are contained in a set of "blocks" as shown in the figure above.
- Global animation settings are in the Heading and Loop blocks.
- Image settings are in Control and Image blocks (yes, the Image block contains settings as well as the image itself). Control and Image blocks come in pairs -- each Control block defines settings only for the Image immediately following; each Image block should have a Control block immediately above it.
- Comment blocks are optional and can be added anywhere in the file.
You can view the images by highlighting an Image block. You can view and edit the settings in any block by double clicking it.
Other GIF assembly programs don't use this 'block' interface; there are no Control blocks, Loop blocks, etc.; just the images and the settings. You usually find the settings under a "Global Animation Property" tab or menu and a "Image/Frame Property" tab or menu.
Editing the images
- Inserting images: You can manually insert images into the animation using the INSERT button on the toolbar and selecting IMAGE. A new Image block is added just below the highlighted block. In Gifcon, remember when inserting a new Image block to also insert a Control block above it. In most programs you can also add images by dragging and dropping from the File Manager/Explorer and by copying and pasting from another application. Most programs accept the standard image file formats.
Sometimes when you add a new image to the animation file, you may get a dialog regarding a color palette conflict. For drawn and gradient images, select REMAP THIS IMAGE TO GLOBAL PALETTE. If you've been following these instructions, your desired global palette should be already in place and the file you are inserting should already have the same palette loaded. Often the reason for the conflict isn't that the colors are different between the global palette and the image you are inserting. but that they are just in a different order. In this case Gifcon will adjust the order of the colors without changing the colors themselves. You should never select any of the local palette settings; these can make your animation look bad and can increase the file size.
- Modifying images: If you want to modify an image in your graphics program, the easiest way is to go back to the original gif image file, modify it, then delete the old Image block from Gifcon and INSERT the new one.
If you no longer have the original image file, you can extract it from the uncompressed animation file selecting BLOCK|EXTRACT from the menu.
- Moving and copying images: You can move or copy an image, control or comment block by highlighting the block and using the cut, copy and paste functions.
- Deleting images: You can delete a block by highlighting the block and pressing the del key or selecting DELETE on the toolbar.
Editing the global animation settings
- Change the screen size and global color palette: These are in Gifcon's Header block. There is rarely a need to edit anything here. The screen is the rectangle in which the animation is visible; it defines the overall size of the animation. Gifcon will automatically set the correct screen width and height with Animation Wizard or when the file is saved after adding new images (this is one of the settings in the SETUP dialog -- 'Adjust header on save'). It's best to let Gifcon automatically set the screen size, some browsers will crash if the screen size is smaller than any of the images.
Browsers tend to ignore the Background color setting and display the web page background instead.
- Change the looping: To edit, double click on the Loop block. The Loop block contains one parameter -- the number of times the animation will repeat (ex. a setting of 1 means the animation will play once then repeat 1 time for a total of 2 run-thrus; a setting of 4 results in 5 run-thrus). A setting of 0 makes the animation loop forever. To play just once and stop, delete the Loop block altogether.
Editing the image settings
- Adjust the timing: Double click on the Control block above the image whose timing you want to edit. You can edit the timing by filling in a new number in the delay box -- each image can have it's own delay. For the bouncing ball animation I edited each Control block to have a delay of 35 (about 1/3 second or 3 images per second), except for the last image which I gave 150 (1 1/2 seconds) so the animation would pause at the end.
The "Wait for user input" setting is ignored by Netscape and IE.
If you leave out the CONTROL block altogether, the frames without the CONTROL blocks will load immediately after the previous frame, with no delay at all.
For looping animations, browsers tend to pause at the last image before replaying the animation. You may want to give the last image a shorter delay to compensate for this pause, or a longer delay if you want a longer pause.
- Interlacing: Located in the IMAGE block, leave this unchecked for each image. Interlacing sometimes causes Netscape to flicker when displaying the first frame. Plus interlacing actually increases the total download time of the animation. Besides, browsers only use it on the first image of the animation; it is ignored on the other images.
- Local Palette: Located in the IMAGE block, leave this unchecked for each image. As discussed previously, global palettes are the best. Using local palettes may cause the animation colors to shift significantly and causes Netscape to flicker as hte local palette is loaded.
- Transparency and Remove by: If you set transparency in your original images, it was lost when the images were loaded into Gifcon. You have to set it again here. Double click on the Control block above the image where you want to set transparency. Check the transparency box, click on the eyedropper and when the image appears, select with the eyedropper the color you want to be transparent. You have to set transparency in every Control Block where you want it.
Note: only one color in an image can be transparent. Also note that transparency is not really a color but a palette number also called a color index); in other words, you can have two of the same color in a palette as two different palette numbers, one transparent and one not.
Transparent backgrounds brings up a complexity that is confusing at first but worth explaining since most animators run into at some point. It involves the "Remove by" setting in the Control block. This setting tells the browser how to dispose of each image after it has been displayed. There are 4 options (though actually there are only two);
 |
* Nothing and Leave as is do the same thing. After an image is displayed it is left on the screen and the next image in the animation sequence is drawn over top of it. Imagine each image is printed on a piece of paper and the animation is displayed by laying down a page at a time, in a pile on a desktop. Images with this setting are left laying and the next image is laid on top, building a pile.
* Background means that after an image is displayed, it is removed from the screen so the background of the webpage now shows. Again imagine each image is printed on a piece of paper and the animation is displayed by laying down a page at a time in a pile on a desktop. Images with this setting are removed, along with all the images under it, before the next image is laid down; so the next image is laid down on the desktop or background.
* Previous is ignored by Netscape, though it works on Explorer. After an image is displayed, it is removed so that the previous image is displayed. Again imagine each image is printed on a piece of paper and the animation is displayed by laying down a page at a time in a pile on a desktop. Images with this setting are removed before the next image is laid down, exposing whatever image was under it; the next image is laid down on the pile on top of previous image.
|
 For images that are drawn as if on a piece of paper -- no transparency, all the same size -- Nothing/Leave as is the best "Remove by" setting to use -- just keep adding the images to the pile. However if there is a transparent area in the image, for the webpage background to show through, Nothing/Leave as is causes a problem. Imagine that instead of drawing the image on paper it is drawn on a transparency; a clear piece of film. As each image is laid down, the previous image shows through the transparency so you see both the new image and the previous one. As a result, you end up seeing a string of objects in all the previous positions.
 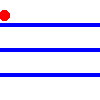 The way to fix this is to remove each image before the next is laid down. In the two bouncing ball animations on the right I have made the formerly grey area transparent so that the white background of the webpage shows through. In the first, Remove by is set to Nothing so each new image is displayed on top of the former. See how all the previous images show? In the second, Remove by is set to Background. You don't see all the previous images because they were removed before the next image is displayed. The way to fix this is to remove each image before the next is laid down. In the two bouncing ball animations on the right I have made the formerly grey area transparent so that the white background of the webpage shows through. In the first, Remove by is set to Nothing so each new image is displayed on top of the former. See how all the previous images show? In the second, Remove by is set to Background. You don't see all the previous images because they were removed before the next image is displayed.
Unfortunately, the topic gets a bit more complex. After the last discussion, you might ask "Why not just use Remove by Background all the time -- it would work for both transparent and non-transparent images?" Yes, but... some of the compression software doesn't work if the animation has "Remove by Background" anywhere in the animation - Gifcon's compression algorithm is an example of this. Other compression programs like Smaller Gif don't seem to have this constraint. So here is the best advice;
Best advice on setting Remove by -- If your animation has a transparent background, use Remove by Background. Otherwise use Remove by Nothing.
Editing Comments
You can add some text information (for example the creator's name, email, URL and a copyright notice) inside the animation file. Comments are not displayed; the only way to read them is to open the file in an animation program like Gifcon. Select INSERT|COMMENT from the toolbar. Comments can be placed anywhere though they are usually placed at the end of the file; elsewhere they can delay the display of the image. Adding comments makes the animation file a bit bigger so keep them brief.
< Previous | Next >
Intro <
Ready <
Plan <
Draw <
Assemble >
Compress >
Place >
More Info >
Inspiration
|