        |
|
Image Properties
|
|
|
|
Image Properties
|
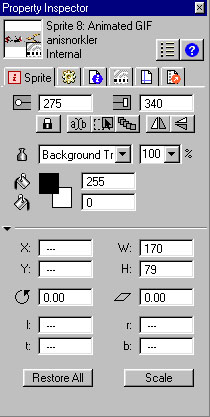
 The
Property Inspector in Director allows you to manipulate images for your
movie. Using the properties of this little animated snorkler, we'll
look at the ways the Property Inspector gives you control of the image. The
Property Inspector in Director allows you to manipulate images for your
movie. Using the properties of this little animated snorkler, we'll
look at the ways the Property Inspector gives you control of the image.
|
 |
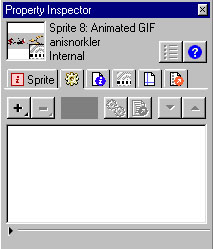
| Notice
that the Property Inspector identifies your image in the window in the
upper left-hand corner. There are several tabs you can select.
The Sprite tab gives you a range of options to choose from. First,
you can choose the frames in which you want your sprite to appear.
This serves the same function as placing them on the Stage would.
Here, the sprite appears from frame 275 to frame 340. |
 |
| From
left to right, here are the fuctions of this series of buttons.
The lock does just that: it locks the sprite from being edited. The next button is only for text cast members. It lets you edit them on the Stage. The third button lets you position the sprite on the Stage during playback. The fourth lets your sprite leave trails as it moves. The fifth (flip horizontal) and the sixth (flip vertical) allow you to invert images. |
|
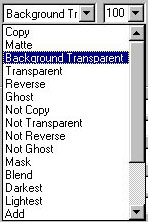
| The Ink
button has a range of options. The one we've chosen here, Background
Transparent, allows the image our snorkler swims across to show around
and behind him. |
 |
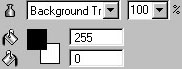
| The blend
percentage is typically set at 100%. The foreground and background
color boxes determine the Sprite's colors. |
 |
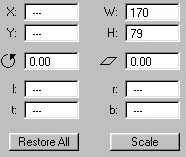
| All the
rest is geometry! X and Y are the registration point of the pixels
from the upper left corner. W and H are the width and height of the
Sprite. The rotation angle rotates the Sprite and the skew angle
slants it. l, t, r, and b (left, top, right, and bottom) show the
location of the Sprite. Restore all reverts height and width to the
cast member, and Scale lets you resize the Sprite. Those are all
the functions under Property Inspector's Sprite tab. |
 |
| The second
tab on the Property Inspector is the Behaviors tab. A Behavior is
a Lingo script that tells your Sprite how to move. To add a behavior
to your Sprite, just drag one of the pre-loaded behaviors from the Library
Palatte and drop it on the Sprite or the frame. Behaviors can add
interactivity and interesting effects to your movie. |
 |
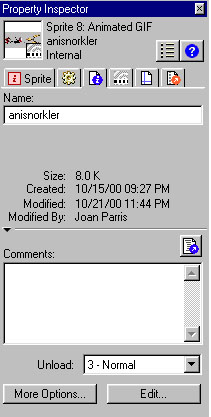
| The third
tab on the Property Inspector is the Member tab. This displays and
selects cast member properties. Note that it gives you the size of
the image, when it was created and modified, and who last modified it.
You can change the cast member's name or add comments about it. You
can also see any scripts that are attached to the cast member. The
Member tab also lets you edit the image and preview any changes. |
 |
| The Animated
Gif tab on the Property Inspector allows you to import animated gifs, like
our little snorkler, into your movie. You can select the gif to play
at the same rate as the movie, a different rate, or at its original rate.
Our snorkler is playing at 5 frames per second. |
 |
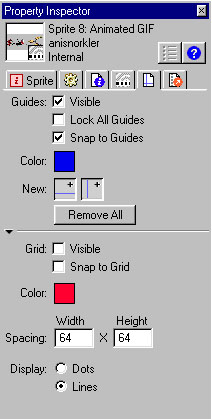
| The next
tab on the Property Inspector is the Guides and Grid tab. This helps
with placement of your Sprite on the Stage. These only show during
creation and editing of the movie; they do not appear in the finished product.
Here we select the colors of the Guides and Grid and decide whether we
want to view them while we make the movie. |
 |
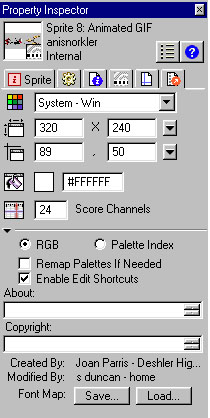
| The final
tab in the Property Inspector is the Movie tab. This lets you appoint
settings that apply to the entire movie. They appy only to the current
movie, however, and not to any others. You can define the system,
the size of the Stage, the color of the Stage, and the number of channels.
You can also define how your movie assigns colors. There is a place
for comments and copyright information. You'll note that this tab
lists who created the movie and who last modified it. You may want
to save and load the fonts. That's it! As you can tell, most
of the time in the Property Inspector you'll spend under the Sprite tab,
selecting properties for individual Sprites. However, it's good to
know the other functions, too. You'll begin to utilize them as you
become more proficient with Director. |
 |
|
|