|
|
Steve Dude's Duke Nukem Page Site Copyright © 1998-1999. Site material designed,and maintained by SteveDude himself. Art work is original using JASC Paint Shop Pro. Images not original to me are used by permission. Duke Fans have Rocked Here
|
|
| George Broussard (Pres. of 3D Realms) george.broussard@swcbbs.com | |
| Kenneth J. Silverman (Programmer of the Build Engine) kjs@lems.brown.edu | |
| Joe Siegler (3D Realms Online Support Manager) apogee@metronet.com | |
| Samuel Stoddard (Maintainer of Apogee and 3D Realms FAQ) ss1@christa.unh.edu |
![]()
The following chart from 3D Realms that I've updated, should assist you in deciding which files you need to obtain:
| Filename | Description | File Size |
| 3dduke13.zip | Duke Nukem 3D v1.3 Shareware Episode - Full File | 5785k |
| dn3d11pt.zip | Duke Nukem 3D v1.0 to v1.1 Shareware Patch | 701k |
| dnsw13pt.ZIP | Duke Nukem 3D v1.1 to v1.3d Shareware Patch | 1349k |
| ppack15.zip | Duke Nukem 3D v1.4 to v1.5 Registered Version Patch | 673k |
| lameduke.zip | An UNSUPPORTED pre-release BETA Version | 3926k |
| dukectrl.zip | External Control Interface API | 23k |
| dukenet.zip | Commit Interface Spec's | 3926k |
| cooldemo.zip | Duke Nukem v1.3d demo file showing 3D Realms Duke Matching during final night of game development | 79k |
| duke3dvc.zip | "Real Video" clips showing items being digitized for game use | 323k |
There are several places you can find a copy of the shareware version of Duke Nukem 3D. Below are only a few different places. If you have web access you can connect to
http://www.apogee1.com for a bigger, more up to date listing of where to find the shareware version. Also, the sites listed on the "Links" page give you access to other preferred sites.
| World Wide Web | http://www.apogee1.com (3D Realms' World Wide Web Site) |
| BBS
(Does anyone still BBS???) |
The Software Creations BBS (508) 365-4035 28.8k v.34 (508) 368-7036 9600-14.4k v.32bis (508) 365-2359 2400 baud |
| Anonymous FTP | Cdrom.com in the ftp://ftp.cdrom.com/pub/3drealms/ area |
| CompuServe | "Go Realms" to get to the 3D Realms Forum |
| America Online | Keyword "3D Realms" to reach Apogee's Forum |
The minimum system requirements are a 486DX2/66, 8
megs of RAM, CD-ROM (registered version), and local bus is recommended.
There are nine weapons in Duke's arsenal, but only six of them can be used in the shareware version.
Duke's Foot:
(Default key- #1) This weapon is your default, if used by hitting the tilde
"~" key, it becomes the only weapon that you can use in conjunction with another
weapon. I use this technique to kick out grilles & vents without wasting my ammo on
them, this also allows me to keep my weapons in hand. If your really coordinated,
you can get up close to an enemy to kick and shoot him at the same time. (My favorite use
is to shoot the default alien trooper just enough until he falls on his knees and starts
choking - Then I use the "~" key and kick him right in the head. That usually
does the trick!).
Pistol: ![]()
(Default key- #2) You start the game with this weapon, (did you
check the box behind you to get more clips?). It is extremely weak and ineffective. It
will take you several shots to kill even the easiest of enemies. Furthermore, it has to
reload every 12 shots (A VERY important fact during a DukeMatch game). The reload is
automatic, but you will experience some delay when reloading. During reload you can't fire
back at an enemy (Did I say a VERY important fact during a DukeMatch game?).
Gun starts: 48 rounds
Ammo packs: 12 rounds
Maximum ammo: 200 rounds
Shotgun: 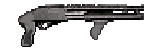
(Default key- #3) Probably the choice weapon for most gamers.
Get up close to your target and its HISTORY. It can do a lot more damage then the pistol,
but it is still somewhat restricted. It can't do nearly as much damage as the RPG or pipe
bomb. Reloading of the shotgun can take some time, but is automatic. Most of the easier
enemies go down from one round of the shotgun.
Gun starts: 10 rounds
Ammo packs: 10 rounds
Maximum ammo: 50 rounds
Chaingun Cannon: ![]()
(Default key- #4) The choice weapon when dispensing of several
enemies at once simply because it has incredible speed and power. Due to this guns rapid
speed you'll run out of ammo for it quite quickly. This gun has no reloading delay so you
can keep right on firing. If you can strafe well during a DukeMatch, then make sure you
use this weapon!)
Gun starts: 50 rounds
Ammo packs: 50 rounds
Maximum ammo: 200 rounds
RPG (Rocket Propelled Grenade): 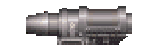
(Default key- #5) The RPG is an extremely powerful weapon. Use
it with care because if you shoot something close by or in a confined area, chances are
the power from the explosion will kill or severely maim you. Just about any enemy can be
taken out with one hit by this gun, Assault Commanders usually take two (End bosses can
take several hits ). If your really good, you can eliminate more than one target if the
other target(s) are close enough to your intended victim.
Gun starts: 5
Ammo packs: 5
Maximum ammo: 50
Pipe Bombs: 
(Default key- #6) By far the pipe bombs are the most fun to
fool around with. They work like this: Once you throw a pipe bomb your weapon changes to
the pipe bomb trigger. At that point you can detonate the pipe bomb by pressing the fire
button or throw another without detonating the first bomb you threw out. In order to throw
another bomb, simply press the key you've designated for pipe bombs (Default weapon number
is six). This will change from the trigger, back to pipe bombs. At this point you can
throw another pipe bomb. Multiple bombs can be detonated by a single use of the trigger.
You can throw as many pipe bombs as you like before detonating them (Did I Mention a VERY
neat trick in DukeMatch play?).
Ammo packs: 5
Maximum ammo: 50
Microwave Expander:
Expander:

(Default key- #7 / Toggle between Shrinker and Expander) Refer
to "Shrinker" above. This weapon works exactly the same - but in reverse. Your
enemies will expand and grow until they burst because their insides were heated by
microwave action. Anyone or anything close to your victim will be jiblets too. Kinda like
alien popcorn wouldn't you say?
Gun starts: 10 rounds
Ammo packs: 20 rounds
Maximum ammo: 50 rounds
There are three types of multiplayer capabilities. There is the usual modem and serial link play. Modem play will require a 9600 baud modem (Minimum). Network play is also be available. Network play can include up to eight players. However, in the shareware version network play is limited to four players.
[
Return to Index]![]()
The Build Engine, which is produced by 3D Realms, is the engine used for Duke Nukem 3D and some other games. The Build Engine is similar to the engine used in Doom, but with advancements. 3D Realms Entertainment claims these advancements "include looking up & down, reflective floors, mirrors, true rooms above rooms, multi-colored lighting (DOOM only had white lights), moving vehicles, translucent sprites (for ghosts, explosions, windows, etc.), rotating sprites, high-res mode for Pentiums, user-modifiable parameters, underwater swimming, and much more."
Quite a few things make the Build Engine better. First of all, there are moving sectors. This allows, for example, doors to swing open (instead of the up/down Doom type doors), escalators, moving subway trains, etc. Secondly, the editor can edit user maps in full 3D mode. With this feature one can edit the levels (or "maps") and see exactly what it will look like during gameplay. Next, the frame rate is not limited to 35 frames per second. The game can run in unusual chained modes like 360 X 240, it can run in any VESA mode up to 800 x 600 (System requirements will be demanding for a VESA mode of 800 x 600 but most of today's systems can easily handle it!). Another great feature will be the 2D/3D map mode. You can edit in two different ways. You can run the 2D mode showing your lines, connection points, tags, etc or you can display a texturized 3D mode which actually shows the level details just like in the game!. Finally, the game supports different glasses. Red-blue glasses will be supported for a pseudo 3D effect and the Crystal Eyes virtual reality glasses for a real virtual reality system.
| Duke Nukem 3D (Apogee/3D Realms) | |
| Shadow Warrior (Apogee/3D Realms) | |
| Blood (Apogee/3D Realms) | |
| Witchaven (Capstone/Intracorp) | |
| Tekwar (Capstone/Intracorp) | |
| Powerslave (Lobotomy Software) |
Unfortunately you can not import weapons from other build engine games into Duke Nukem 3D. The registered version comes with utilities to import graphics and sounds, but importing a weapon would require coding.
Yes, but you won't be able to do much at all. The different games have different sector tags and ways of defining what the sectors do. You could do some very basic editing, but nothing interesting. You may be able to import some graphics and/or sounds if the formats are compatible.
The Build Engine was programmed by Ken Silverman. It is owned by 3D Realms. They have agreed to license it to other companies for their games (See section 3.3 above for a partial listing).
[
Return to Index]![]()
| Name | Other Apogee/3D Realms Game(s) |
| Todd J Replogle | The Thor Trilogy, Monuments Of Mars, Dark Ages, Duke Nukem I, Cosmo's Adventure, Duke Nukem II |
| Name | Other Apogee/3D Realms Game(s) |
| Stephen A Hornback | Major Stryker, Cosmo's Adventure, Duke Nukem II, Rise Of The Triad |
| Chuck Jones | Rise Of The Triad |
| James Storey | Rise Of The Triad |
| Dirk Jones | Rise Of The Triad |
| Name | Other Apogee/3D Realms Game(s) |
| Lee Jackson Bobby Prince |
Rise Of The Triad |
| Name | Other Apogee/3D Realms Game(s) |
| Richard Gray | Blood |
| Allen Blum III | Duke Nukem I, Duke Nukem II, Major Stryker, Cosmo's Cosmic Adventure |
![]()
This is a listing of the secret and bonus areas
from each level. DO NOT read any further unless your really stuck. O.K. - I warned
you! If your like me I don't like to leave a level until I have discovered ALL the
secrets and/or secret levels (Especially the Secret Levels!).
1. Underneath the "Innocent" sign (located outside) is an RPG. To get the RPG, you need to do quite a bit of jumping. First, jump onto the brown crate in the street underneath the sign. Secondly, Jump from the brown crate to the inclined ledge which is next to the crate. Finally, jump to the ledge just underneath the Innocent sign. Take note, the secret isn't the RPG, but the ledge underneath the Innocent sign. (It's possible to trigger the secret for the end-game count and not obtain the RPG).
2. There is a hidden apartment near the Innocent sign. To reach it you must jump on top of the brown crate located below the Innocent sign. Jump to the inclined ledge. Finally jump into the middle window to find the hidden apartment which contains a box of ammo for the RPG. Be aware, you are not credited with finding the secret apartment unless you move close to the couch inside the apartment. That is what triggers the secret. Another way to enter is jump on top of the parking sign located near the burning dumpster. From there, jump onto the inclined ledge below the windows. The final step is to jump into one of the two windows.
3. Inside the hidden apartment there is a door that is being covered by a poster. Open that door in front of the "Attack Of Bleached Blonde Biker Bimbos" sign. Inside you'll find a bottle of steroids.
6. There is a hidden room with a door in the Projection room. To open it, stand to the left of the fire extinguisher and press your use key. Inside you'll find a box of shotgun shells and.... you guessed it - more aliens!, This secret can also be reached through the ventilation shaft. This other entrance is found in the bathroom wall vent cover above the bathroom stalls. Shoot or kick the vent cover to enter the ventilation shaft up to the hidden room.
7. While in the projection room, turn on the projector switch and watch the dancer appear on the screen. Do you see that crack in the screen? Take your new-found RPG and blow a hole into it to reveal another secret area behind the screen itself. (God your a stud-muffin, do you always have that effect on the ladies?) For those that are aiming challenged, you can also use a pipe bomb to open the hole in the screen. Here you will find a jetpack (needed for the other secret area and bonus area), shotgun ammo, and aliens.
8. The final secret area is in a hidden apartment room next to the theater marquee, behind the palm tree. The easiest way to get there is to jump down on the building ledge before you cross the small bridge that leads to the end of the level Nuke button. Walk around the ledge until you reach the front of the building next to the palm tree. Jump on top of the palm tree and go through the window into the secret "red" apartment. Inside you will find a RPG, chaingun, and pipe bombs (and a pretty cool cable TV show!) If your jumping challenged, use your jetpack to fly through the window.
By playing the Duke Nukem arcade game in the arcade you open a secret door. Walk up to the game and try using it. Duke will say a great one-liner which lets you know the door opened. It is located to the right of the Duke arcade machine. If you decide to jump into the small alcove, and the door closes, there is a toggle switch inside that will open the door from the inside. (This is one of my favorite DukeMatch hiding spots!)
Jump onto the trashcan outside the arcade entrance while facing the wall, You'll see an alcove open above you with a small medkit, box of pipe bombs, and a pair of night vision goggles. (Tell me you didn't shoot the garbage can in a fire-fight with an alien trooper!).
While you are on the exit bridge turn on your jetpack and fly up as
high as you can. Once you reach the top you'll see two gun turrents mounted on
opposite walls. Take both turrents out as they do register in the enemy count at the end
of the level. At the top you will see a hidden alcove that was guarded by one of the gun
turrents, which contains two boxes of shotgun shells and a jetpack.
Misc Info - You can enter the front of the theater by shooting through the ticket booth window once you find the RPG.
1. Inside the Forbidden Videos & Books there is a hidden holoduke and healing atom. To reach this secret go to the back left corner of the bookstore, behind the counter, opposite the security monitor. Jump on top of the bookshelf to get the healing atom. Reveal the hidden door by pushing against the wall in the corner to find the holoduke.
2. Inside the Forbidden Videos & Books are several book cases. The middle bookcase along the wall conceals some pipe bombs and armor.
3. Walk down the dark hallway past the locked door in Forbidden Videos & Books, follow the corridor to a small passageway to the right of the elevator. There you will find a healing atom, alien trooper and a pig cop. This secret is easier to locate when using the night vision goggles.
4. There are two ways to access a hidden area in the sewers, which contains steroids and a holoduke:
A.) Use the blue key card to demolish the building opposite the key card switch. Pick up the yellow key card in the wreckage and locate a manhole cover which is found in the demolished building. Use a RPG or a pipe bomb to blow-open the manhole cover. Jump into the manhole and follow the sewer to the end, take out the Octabrain. At the end if you look to your left you'll see an inclined area. This ramp leads upwards to the bathroom in the strip club. Here you'll find the holoduke and steroids. Unfortunately, you cannot enter the strip club from the sewer because the door is locked.
B.) The alternative way to locate this secret is enter the only stall in the strip club's bathroom. The back wall of the stall is a locked door which can only be unlocked from the bathroom side. Once you open the door you'll be at the top of the secret ramp which leads into the sewer, the goodies will be on a shelf to your right.
5. Near the back left corner of the dance area is a couch. By standing on this couch you'll open a door on the right-side wall behind the dancers. The door only stays open for a very limited amount of time so you'll have to hurry to make it before the door closes. Inside you'll find a chaingun and a box of chaingun ammo. (There is a toggle switch which opens the door in case it closes while you are inside).
6. There is a ventilation shaft on the right-side wall in the dance area. You'll have to shoot the vent cover and use the table to jump into it. This passageway leads to the backstage area. As you crawl through the shaft you will pick up a healing atom and a box of pipe bombs. The backstage area leads to the level exit.
7. A pair of night goggles can be found backstage on the ledge next to the lever that operates the curtains. To get there up there you can jump from the ledge leading to the attic or use a jetpack.
8. The Backstage attic will have two wooden crates. Look at the wall behind these wooden crates. It has a small illuminated area. This is actually a door. Swing open the door to reveal a medkit.
When you are inside the bathroom at Forbidden Videos & Books using the dryer will cause a door to open in the middle of the bathroom (between the hand dryer and the stall) revealing a pair of night goggles.
Outside (directly opposite where you started), go toward the "bar" building and use the inclined ventilation shaft (next to the burning garbage can) to access the ledge to the left of the shaft. Here you'll find ammo and some health.
[Return to Index]
1. After lowering the electric chair (where you
start Level
2. Shoot the 2 stained glass windows in the church chapel and push the face on the chapel alter. This causes the cross to turn upside-down and open a door behind the stained glass window on your left. Take out the Octabrain and enter the door which leads you through a tunnel where you can pick up a chaingun and see a "DOOMED" space marine.
4. The jail cell with the toilet has a bed. Push against the bed to reveal a crawl space. Inside the crawl space you'll find RPG ammo.
5. In the outside gun turrent area there are small inclined ledges on either side of the locked door. Jump onto one of the ledges, then onto the flat level where the turrents are. Jump onto the ledge above the locked door and walk through the wall to find some healing atoms.
9. Inside the submarine, there is a hidden door on the wall behind the crate. Inside this room you will find the ship's reactor core and a Medkit.
10. At the door between the submarine and the gun turrent area, you will find a switch on a ledge to unlock a door. Jump onto the ledge, crawl and hit the space bar to open a small alcove containing night vision goggles.
In the room where you can witness an execution, there is a different color wall that opens to reveal a holoduke (on your left as you face the electric chair).
In the rotating gear room, jump onto the short gear and then onto a ledge to pick up some health. Here there is also a secret wall that opens to reveal night vision goggles.
In the holographic head - central control room, look for the vent shaft cover. Shoot-out the cover and crawl into the ventilation shaft. Here you'll find some armor. Don't go too far or you'll fall into the corridor opposite the rotating gears (Falling is BAD, shooting aliens is GOOD).
At the very end of one of the cell block halls there are some yellow C-9 canisters. Shoot at the canisters to cause them to explode revealing some health and another way back to the cell with the bed.
One of the jail cells contains a poster with a blue background. Walk through the poster to a hidden underground passageway containing a pipe bomb. Use the pipe bomb to create another passageway to the submarine.
1. At the beginning of the level, underwater near the sub, look for an underwater cave. There is an octabrain at the opening of the cave. Follow the tunnel all the way to the end. You will see pipe bombs and more Octabrains. When you come out of the water you'll be in a secret area with barrels and a cocooned woman. Blow up the wall behind the barrels to get out.
2. Stand on top of the sunken sub and walk through the fire burning on top. This causes a secret place to open inside the sub. Re-enter the sub, go to the top to collect some armor and a Medkit.
3. Go to the ledge that overlooks the sunken sub and has the blue access card. Both of the alcoves that have a mounted gun turrent have secret doors. Only the one on the right counts as a secret in the end-level count. Jump to the right alcove & open the secret door in the back on the right-side wall and you'll find RPG ammo. (The alcove on the left cannot be reached without a jetpack. The level designer assumes you cannot have a jetpack without using a cheat code. Once you jetpack over, the hidden door is on the left wall near the back. Inside the wall will say "How did you get here?") Near the front of the hidden room on the right wall open another hidden door. It contains a holoduke.
4. After you enter the structure using the blue access card walk to the part were the hallway begins to bend. The wall on your right opens to reveal an elevator leading to a room of alien troopers and a chaingun.
5. In the processing area take the conveyor belt past the small slime pit. Crawl off the conveyor belt into the slime and open the wall on the left side. The back wall of the landing opens where you can collect the chaingun ammo.
6. After the red toxic area the conveyor belt brings you to a room
with two cylinders. Activate the blue circuit switch on the wall to open the cylinders.
Jump in the left cylinder to get some healing atoms.
7. In the flood area, once the water level is raised, there is a "V" shaped rock, the right side leads to a cave that you have to jump to. Go to the rear of the cave and jump onto a small ledge to get RPG ammo, a Medkit, and a shotgun. (TIP - This is very dark, you may need to use your night vision goggles).
8. Rock Wall - I After jumping off the right side of
the "V" shaped rock, on to the landing, you will see a crack on the wall to your
left. Blow the wall open with your RPG or pipe bomb to reveal a small cave and an alien
trooper.
9. Rock Wall - II Once inside the small cave you will notice another crack on the wall, blow this open too. Collect a healing atom and see another crack in the wall to your left.
10. Rock Wall - III Blow open yet another crack on the wall of this cave for the last secret in this area and a shortcut back to the start of the level.
11. In the control room with the large door, to the right of the switch that operates the water level, there is a secret door and crawl space. Duck to enter the crawl space to get to some shotgun ammo and scuba gear.
12. After going through the double doors and the rotating gears, you'll come to a place where you travel through the tunnel with the flow of water. Keep an eye on the right-hand side wall for a crack. Blow it open using a pipebomb or RPG. Inside you'll see a Medkit and a transporter. Use the transporter to reach a secret area with aliens and RPG ammo.
13. At the start of the green tunnel look for the source waterfall. Right above it is a ventilation fan. Shoot the fan out and jump on the ledge on the right-hand side of the room. Inside you'll find two healing atoms.
14. In the sewer rapids area (your moving pretty fast) stay to the left side of the wall, the last lighted part of the sewer before the end there's a small bump-out area. There's also a crack in the wall. Blow the wall open using a RPG or pipebomb. This will reveal some aliens, ammo, and also contains the secret exit to level 6 !
After you pass the rotating gears you are in an
area with two black wall panels. The upper-half of the wall in the back right corner is
transparent. Go through it to collect the armor and scuba gear.
Under the water in the flooded area, you can blow open one of the
walls in the center to reveal some goodies.
1. The large room facing the fire pit area has a wall on the left that has a secret door concealing some steroids.
2. In the ceremonial fire pit room, jump into the fire surrounded by high stone walls on all sides. This will transport you to a locked room by the rope bridge. On the ledge there are two healing atoms. You'll also notice some aliens have just transported in.
3. In the secret room mentioned above in #2, jump on to a stepping stone. Use it to reach an alcove in the wall to your right. Collect the RPG ammo.
4. After climbing up along the lava falls all the way to the top, shoot the weak spot in the wall to open a long passageway with a variety of ammo. The area at the far end of this passageway is the actual secret that counts at the end of the level.
5.
Pressing the switch at the top of the lava falls opens a passageway leading to a secret
cave. Follow the passageway until you come to a large bon-fire with some healing atoms and
a girl dancing wildly. Duke also tells you what's on his mind!
6. On the wall to the right outside entrance to the spaceship, there is a secret door
leading to a small plateau and a healing
atom.
After you enter the "blue key" door, there is a dark area to your left. If you use the night vision goggles, you will see "Go with the flow" written on the wall.
Go up the winding stairs in the cave area where you can hear chanting, you will come to a landing with a window, You will find health and armor on the ledge.
From the area described above, go down until you reach a small spring waterfall. Jump into the waterfall and behind it you will find a chaingun.
In the ceremonial room with fire, press both red hands on the wall. A door will open to reveal an RPG.
From this area described above, jump onto the alcove where you will find a pair of night vision goggles.
From the beginning of the lava area, go to your right (The side with the shrink-ray). Use a jetpack to fly into the cave with the shrink-ray. On the wall you will see a message "You are not supposed to be here - LevelLord".(This is reminiscent of some Quake levels)
After you first come upon the spaceship, you'll come to the part of the level in which you must jump from pillar to pillar. If you look at front of the first pillar you'll see the "Dopefish Lives" message. (This message is near the bottom, the easiest way to see it is put the game in "God mode" - Jump down, and once you reach the bottom, begin looking for it on the pillar).
As you face the huge ship door the wall behind you in the right
corner is actually a door, open it and follow the path up until you reach the healing atom.
1. After you obtain the blue keycard in the room with the 2 force fields, go back into the room with the slime pond. The grate on the bottom will now be open. Swim through the grate opening into an area that contains various ammo and powerups.
2. In the large room with pillars, you will find a fan in the ceiling above the ramp. Shoot the fan and use a jetpack to reach the hidden items.
3. In the control room near the large bay doors, a section of the wall to your right will open to reveal some armor.
4. After the rocket has been launched, underground you'll arrive at a room with a lot of computer monitors. One monitor will open to reveal some healing atoms.
1. From the starting point as you enter the larger room, turn left and there will be an alcove with a monitor. Stand near the monitor and quickly turn-around. A small niche will open behind you. Jump into the opening to obtain some RPG ammo.
2. In the room with several monitors near the starting point, one of the monitors is a secret door opening to a small room with alien troopers and a healing atom.
3. In the room with the blue keycard, kick or shoot the vent cover and jump into the vent ducts. Jump up a couple of levels to get a pipe bomb and you will exit at the corridor.
4. To solve the puzzle of the 4 switches, turn the 3rd switch from the left, and the 2nd switch from the left to enter the door behind you. There is a portion of the floor and wall that is well lit, this is actually an elevator. Use the elevator to go to a lower area to obtain a shrinker and armor. Find the opening in the wall and follow the passageway to a lift that will take you back to the area of the 4 switches.
6. Use your jetpack to fly up the center column after the force-field is de-activated (It de-activates after you solve the switch puzzle). Near the top you will see an enforcer patrolling a small room. In that room is a healing atom and a devastator.
The area where you use the blue keycard access, there are 2 monitors, one with a picture of the Earth and one with a picture of the Moon. The monitor with the Earth's picture will open to reveal a holoduke.
The room that has the blue keycard has a panel next to the boxes where the blue keycard sits. Open the panel to reveal a pool of water (Did you get the scuba gear in this room?), swim to the bottom to find the chaingun. There is a connecting passageway that contains night vision goggles.
Misc Info. - Some people forget to turn around when starting this level. Behind you is a transporter to the green space shuttle which is docked. The transporter will take you aboard the shuttle where you will find steroids and a RPG.
1. After you pass the strobeing corridor, you will enter a room that has a yellow on/off switch. The walls have a metallic texture. As you enter the room from the corridor you will see on your left a different texture of a small door. Open the door to obtain some pipe bombs.
2. Jump into the small alcove as described above, there is another hidden door to your left. Open the door and there is another secret room containing armor and shotgun ammo.
3. When you enter the beige corridor, you will see a "Earth Defense System" emblem on the wall. Jump into the emblem to find a medkit.
4. The first dark room you come to on the other side of the beige corridor has an armory access and a computer terminal with blue sloping lights. In-between these two is a metal door that will open to a small room containing a freeze thrower and a holoduke.
5. As you go up a ramp to the second dark room, there is another metal door directly opposite where you enter from. Open it to reveal chaingun ammo and a healing atom.
In the room where secrets #1 and #2 are located, you will find another small metal door on your right just before you enter the beige corridor. Open this door to obtain night vision goggles.
In the large "Green" room where the end-level Nuke button is, there is a gun turrent. Destroy the turrent and use your jetpack to fly up to the gun turrent alcove. The rear wall panel will open to reveal some pipe bombs.
1. Enter the yellow keycard door and go up the ramp to the top level. As you enter this room to your right is a metal door with a light in the ceiling above it and a camera (Near the illuminated First Aid access). Open this door to obtain steroids. In the upper corner is a switch, shoot the switch and QUICKLY run to the other side of the room. Enter a lowered column and Scotty will beam you onto the the Starship Enterprise! (O.K. - I realize Scotty is not part of the Starship Enterprise, but it sure sounds better than "Hey ensign, beam me up").
2. Go to Piccard's quarters and operate his console, now get ready..........." REALLY Ready" for this room!
In the first large room you enter, go to your left towards the armory. The panel on the left wall before the armory will open for a freeze thrower.
In the same room, go to the elevator on your right. There is a panel on the right-hand side before the elevator that opens to reveal some pipe bombs.
After you open the yellow keycard door, go up the ramp, open the door and you will see a large metal panel in front of you. This panel will open to a room with a devastator.
In the first room you enter near the starting point, take the elevator to the right which leads to the lower level. Go down the ramp to the metal door. On the other side of this door you will see a console on your left with shotgun ammo and a button that raises a map. Go behind the console and open a wall panel to get a shrinker.
Before you get to the end-level Nuke button you will enter a red room with rotating walls. Use your jetpack to get 2 healing atoms on the top ledge of the wall closest to the blue column (Access is through a lower level, the upper level has a room that allows you to view this area only).
1. In the room with the electric arcing pistons, search the middle of the wall opposite the electric pistons to enter a secret area tunnel.
2. If you turn left upon entering the tunnel you'll find a health pack, use your jetpack to fly up to the top to another hidden tunnel. Here you will find pipe bombs and an exit back to the main room.
3. If you turn right upon entering the tunnel you will go down and find a bonus area with 2 healing atoms. You will see a small red tunnel, to get to the the tunnel, access this area by jumping into one of the electric arcing pistons where you'll find a chaingun. Opposite the tunnel is a wall with a different texture. This is secret #3 containing chaingun ammo.
4. In the room with the rotating water paddle, there is a monitor. Walk in front of the monitor to hear a door opening. QUICKLY run across the room opposite the monitor to see a secret room opened containing a freeze thrower and ammo.
5. On the third level of the central complex, enter the room immediately to your left containing alien troopers and eggs. The column in the corner of the room will open for some armor.
6. Also on the third level of the central complex are double doors. Enter the hallway through the doors and fly up the first ledge you come to. On the right is a crack in the wall that can be exploded to reveal RPG ammo.
7. The same ledge to your right has a circular vent cover. Kick or shoot-out the cover to kill an enforcer (WOW - What a secret!)
See #3 above
In-between the electric arcing pistons is a medkit.
[
Return to Index]1. After opening the door and going past the Earth Defense Forces emblem, open the next large door you come to and crouch down. There will be a small passageway on your right, in the door jamb, with a healing atom.
2. Upon exiting the corridor with the neon blue light strips you will enter a large room with panels that will open to reveal a look at outer space. Over your left shoulder as you enter the room is a door up on the wall. This door will open once you activate it by stepping on the ramp in the 2nd section of this large room. Use your jetpack to fly up to find RPG ammo and atomic healing.
3. In the second section of this room, before you get to the ramp, turn to your right and go up the sloped wall. Enter the vent shaft to find an RPG and armor.
4. In the room with the blue keycard and BattleLord bosses, there is a set of monitors in the back of this room. The lower right monitor will open to reveal a small secret room with a trip bomb and atomic health.
After killing the two BattleLord bosses at the end-level Nuke button turn around from facing the Nuke button. Near the ceiling on you right is a switch. Shoot the switch and a door will open to your left just below the level of the platform your on. Jetpack into this room to access a SECRET LEVEL (Spin Cycle - See Level 10).
Misc Info - For all the sick puppies like me out there - Once you find secret #1 you will notice a switch inside this passageway. let the enforcers and/or alien troopers come after you. Hide in the passageway and once the aliens are on the door, press the switch and they will squish like bugs. When the door opens you'll have alien taffy stuck to the door !
[
Return to Index]1. Get into the Supply Door and straight ahead between the armor suits is a secret door containing a medkit.
2. Once you enter the main door with the Tiberius Station sign, on the wall to your right is a crack. Explode the wall open to find a vent passageway leading to all other areas. In the vent shafts you will find shotgun ammo, and pipe bombs.
3. Enter a false wall in the dark corridor opposite the drinking fountain. The corridor is located between the 2 elevators. Here you'll find pipe bombs.
4. Open a hidden room next to the "Danger: Radioactive Material" door. If you look closely this wall indents from the normal wall to the left of the door. Inside is chaingun ammo and steroids.
5. In the toxin pool at the waters level, go to the middle of the left-side wall. A room will open with RPG ammo.
6. Do the same for the right-side wall to get 2 healing atoms.
7. After crossing the bridge in the toxin pool, use the lift to get up the next level. Before you open the door and cross the bridge to the red keycard access, you will see a crack on the wall on your left. Explode the wall to reveal a jetpack.
8. Once you defeat the BattleLord in the red keycard access room, you will notice a vent cover to the left of the door you entered through. Shoot or kick the vent cover and crawl into the vent shaft. Go to the first vent cover on your left that you come to. Kick or shoot out the vent cover and QUICKLY use your jetpack to fly to the small door that just opened in the corner wall near the ceiling. Here you will find an RPG. (If you missed this on your 1st try, fly back to the vent shaft (turn your jetpack off so your touching the vent shaft floor) and the door will open again. It is "touchplate" activated).
The room with the blue keycard has 2 small metal doors next to the monitors, each of them opens. One reveals a holoduke.
When accessing secret #8, you will find a medkit and freeze thrower ammo.
[
Return to Index]1.Drop through the red shaft in the Crews Quarters, shoot at the vent cover across from you to open it. Operate the switch on your right as your facing the vent cover, QUICKLY run across the pool to a small opening across from you to your right (It is lit up). As you face the pool of water, go to the corner column and open a small area to get 2 healing atoms. Go back to the small, illuminated opening and operate the switch there. You can either try to access the vent cover opening once the movable walls pass by you or you can go back to the red shaft area. If you go to the red shaft area, operate the switch again, go straight ahead through the vent cover opening (This is the recommended way especially if your not fast enough - Otherwise it's Duke jibs all over the place!).
2. On the other side of the vent cover described in #1, you will be on a ledge over-looking a moon chasm. To your left is a set of monitors, open the panel for a health pack and chaingun ammo.
3. From the same ledge, there is a cave below where the gun turrent is. Use your jetpack to fly into the cave (You can jump to this area but it's not recommended, you know, with Duke's knee problem and all). Once your in the cave you will find a shrinker and a secret door that will teleport you into the yellow keycard corridor. "May The Force Be With You Young Skywalker".
4. In the Blue light corridor, enter the vent shaft on your right and take this shaft until you are between the 2 chasms. Shoot the top of the vent and get on top of it. You will see a secret cave to your left.
5. Follow the yellow rotating gear to access the room with the red keycard. The panel to the right of the card will open to reveal a holoduke and freeze thrower ammo.
6. Once your in the reactor room, turn on the lights. You will see 2 alcoves behind the wall partitions of the reactor pool. Jump up into the left alcove for trip bombs and devastator ammo.
7. The alcove on the right in the reactor room has RPG ammo.
In the blue strip light corridor, you will see a portion of the floor that has sunk-in. This activates the earthquake that destroys the rest of the corridor. If you REALLY need pistol ammo, BEFORE you step on this portion of the floor, use your steroids, jump over the sunken-in part of the floor and pick up your ammo. Did I mention... run like a Mother!!!
Before you get to the yellow rotating gear you will see a crack on your left near the ceiling of this corridor. Explode the wall open which allows you to get back to the central corridor without having to use the red keycard.
Jump into the vent located before the Reactor Door (Yellow keycard) to get a healing atom.
Bathroom Stall on the left has a RPG behind the toilet
Vent shaft located just before the 2nd Crews Quarters door (Where the BattleLord is) has a healing atom.
[
Return to Index]1. You will see a map panel as you approach the striped blue building between the Alpha and Beta corridors. Open the panel to reveal 2 healing atoms.
2. Explode open a crack in the wall at the Alpha train waiting area to get a devastator and small health packs.
3. In the Alpha section when you pass through the earthquake area, you will come to a door there. Open the door and go to your right. In between the medical table and the water tubes is a metal textured wall that opens and allows access to the weapons you see on the bottom of the water tubes (This is duplicated on the left side of the room also).
4. In the Gamma Transport train waiting area, check the map panel which opens for a shrinker and trip bombs.
5. In the Gamma Sector, enter the vent straight ahead of you as you exit the lift. Follow the vent shaft and enter the room on your left. On the left side of this room is a crack on the wall, explode the wall open to reveal a secret area containing pipe bombs.
6. In the Beta train waiting area is a vent in the ceiling above the map panel. Use your jetpack to fly up the vent for 2 atomic health power-ups.
7. After jumping out the black monolith, to your left is a crack on the wall near the ceiling, explode the wall open to reveal a passageway to a SECRET LEVEL (Lunatic Fringe - See Level 11).
After you exit the Alpha train, immediately to your right is a cubicle with freeze thrower ammo.
In the operating room where the blue keycard is, jump into the various ducts where the protozoid slimers have just emerged from. You will find armor, atomic health, and ammo.
1. Opposite the underwater tunnel you start from is a red hand print on the wall. press the hand print to open the center column for a healing atom.
2. Solve the switch puzzle on the map panel opposite the red column with the green rotating shaft (Turn all the switches on except the middle switch to the right). The red column will now lower itself, jump on the column to get a freeze thrower. You will hear the sound of a door opening, QUICKLY jump off the red column and go to the other column on the waters edge to a secret alcove with a RPG.
3. Explode the wall open in the hallway with the BattleLord for a medkit.
4. When fighting the OverLord, if you get past him into his control room, a wall facing the door where the OverLord came from will open for a medkit.
Jump into the middle level waterfall for a secret ledge containing a healing atom.
The picture of Saturn in the hallway where the BattleLord is (See secret #3), will open to reveal shotgun ammo and a health pack.
A wall opening in the large green room before you meet the BattleLord has a pool. Swim to the bottom for a RPG, medkit and follow the tunnel for a devastator.
Secret level is accessed from level 5 - No bonus areas
Secret level is accessed from level 8 - No bonus areas
1.Upon entering the Sushi Restaurant there is a ceramic figurine of a Japanese woman, to the left of this figurine is a false wall that you can jump into for a small health pack.
2. Search the Exotic Girl poster in the middle of the corridor for a shrinker.
3. Explode open the crack on the wall in the last room on your left as you go down the corridor to reveal shrinker ammo and 2 health packs.
4. Search the price list chalkboard to the left of the fluorescent BAR sign for armor (Make sure you jump into the cubicle so it will be counted as a secret).
5. In the sushi bar room, there is a bloody hand print on the partition wall to the right of the sushi bar. Press the hand print to open a small room around the corner to your right for a freeze thrower.
6. Opposite the hand print is a cupboard at ground level. Open the door and crawl into the cupboard to get night vision goggles. Turn on the night vision goggles to read a message on the left panel to access pipe bombs and chaingun ammo.
7. In the kitchen, search the wine bottle storage rack next to the entrance door for RPG ammo.
When you first start the level, turn to your right and open the black window in the middle to get a devastator.
Before you reach the top of the ramp to enter the Sushi Restaurant, jump over the white partition wall to get a pipe bomb and healing atom. Use the pipe bomb to open the crack in the wall to reveal a pool of water, swim to the bottom to get chaingun ammo.
When you first enter the Sushi Restaurant there is a Dukai Sushi sign (Get it? - Duke-Eye Sushi), stand in front of this sign and a small alcove to your left will open for shotgun ammo and a small health pack.
Break the large vase next to the price list chalkboard (In the dark corner), get the night vision goggles and activate them to reveal Duke's secret message for lovemaking.
Shoot the fan on the ceiling to the left of the Karaoke stage, fly into it using your jetpack and follow the vent ducts to the maintenence room to find steroids on a ledge.
Jump into the Exotica sign to the right of the Karaoke stage to teleport back to the outside entrance.
Use the microphone to hear Duke's rendition of the Steppenwolf's song "Born to be Wild".
Above the floor level cupboard (See secret #6) is a vent cover. Shoot the cover to access a trip bomb in the vent shaft. This can also be accessed by shooting out the fan on the left above the stove in the kitchen.
Next to the blue keycard is a cash register. Operate the cash register to reveal several teleporters that will take you to various places within the level.
In the kitchen, open the back wall in the middle of the stove to get a jetpack.
Jump into the kitchen sink to access the pool outside. Swim to the bottom for 2 health packs.
1. Open the ATM machine in front of the bank to reveal a small room with a chaingun.
2. In the blue keycard area, operate the switch on the desk. The painting behind you will open to reveal a devastator.
3. As soon as you enter the bank there is a dark wall to your right (Where the crouched pigcop is shooting at you). High on the wall is a button switch, shoot the switch to open the hanging telephone behind you to reveal a holoduke.
4. At the security guard desk before you enter the secured area door is a painting behind the desk. Open the painting for health packs and a jetpack.
5. From the red keycard platform jump onto the middle gear and walk around to your right until you see a red crack on the wall near the "Gamma gear". Explode the wall open to get atomic health.
From the top step of the bank, jump onto the ledge below the black windowed building - Follow the ledge for armor, a trip bomb and a healing atom. Where you pick up the healing atom, jetpack across the street to the opposite ledge for shotgun ammo and a RPG.
Misc Info - To access the gear room and solve the puzzle you must turn the middle switch on the desk to "on" (Leave the other 2 off). Turn the switch mounted on the orange pedestal to the 3rd position from the left.
1. Shoot the seaweed underwater near the waterfall with a RPG or Devastator. Enter the hidden cave to get a health pack, devastator ammo and scuba gear. Swim up to the waters surface to get more health packs, pistol ammo, shrinker ammo and a devastator.
2. On the ledge with the blue keycard, jump into the false wall to the left of the keycard (No powerups).
3. After exiting the yellow keycard door to get to the roofs level, turn to your right to enter a small cave with a healing atom. Open the rear of the cave to reveal a jetpack.
4. Fly to a ledge on the right-hand side of the Alley Cat Lounge building where you will find a chaingun. Open the secret window from the ledge to get chaingun ammo.
5. Push the yellow "Hard Hat Area" sign inside the red keycard room, a crate door will open around the corner to the left to reveal 2 health packs.
At the starting point there is a rock column in-between the small and larger waterfalls that contains shotgun ammo.
Once you are on the roof of the white building where the yellow keycard access is opposite the Alley Cat Lounge sign , an assault commander will come out of a cave opposite you. Jetpack into this cave for RPG and devastator ammo.
On the same white building roof but opposite end where the yellow keycard
There is a ledge on the white building near the yellow keycard door just below the roof. On the shaded ledge (Opposite the waterfall) you will find a healing atom, walk around the corner on the ledge to find a shrinker.
On top of the Alley Cat Lounge sign is a healing atom.
There are 2 crates on the floor opposite the "Hard Hat Area" sign. Jump in-between them to find RPG ammo.
1. Explode the crack on the right-side wall open as you exit the sewer tunnel for a freeze thrower.
2. In the kitchen area with the blue keycard is a knife on the countertop to your left as you enter the room. Check the pantry underneath the knife for a healing atom.
3. In the CEO office, open the painting to the right of the red keycard for devastator ammo.
When you enter the brown walled room (The room before the kitchen where the blue keycard is), activate your night vision goggles and look at the dark wall to your left to see " Under the Knife". A reference to secret #2.
In this same room before you enter the doorway to the small office, check the wall to your left for a health pack and devastator ammo.
Open the cupboard to the left of the red keycard for RPG ammo and a jetpack.
Blowing a hole in the wall to the left of the blue keycard gives you access to the elevators without using the blue keycard door.
Jump on the ledge with the "Quake" sign causes an earthquake to which Duke exclaims "I ain't afraid of no Quake" (A reference to ID's game called Quake, released around the same time as Duke Nukem 3D).
1. Go behind the cash register area at the starting point and operate one of the cash registers. QUICKLY run to your left to the snack vending machine near the blue keycard. The vending machine will be open to give you 3 healing atoms.
2. Jump into the Earth screen facing the spaceship movie set for a jetpack and shrinker.
3. Use your jetpack to search the crates just below the top level for a devastator. These crates are opposite the Stage 17B sign.
4. Jump into the Duke Nukem 3D billboard where your helicopter crashed. Access is through the 3D Realms Logo in the lower right corner for atomic health, a freeze thrower and devastator ammo (The secret won't register unless you enter the cubicle where the freeze thrower is).
In the snack vending machine room, activate your night vision goggles and look at the wall opposite the phone to see "Push the Register, Not the Snacks" referencing secret #1.
In the stage room accessed by the blue keycard, shoot out all the vent covers and search the vent ducts for RPG ammo and access to the crate next to the Stage 17B sign that has a healing atom.
To the right of the Earth in the spaceship movie set is a crack on the wall that can be exploded for a healing atom.
Behind the monitor in the small room accessed by the red keycard is a door that opens for RPG ammo.
On the Moon movie set opposite the USA sign is a ledge containing a healing atom.
There is a switch on the USA sign in the Moon movie set, active it to open a room next to the USA sign and access the the SECRET LEVEL - Tier Drops (Level 10).
Misc Info - DO NOT go down the stairs to the end-level Nuke Button if you plan to go to the Secret Level without saving your game first.
1. At the first station, search the Lunar Apocalypse poster for a chaingun.
2, Jump onto the red left condom dispensing machine next to the phone for a holoduke.
3. Walk on the train track towards the second station, explode open the crack on the wall to your right. The crack is located to the right of a box on the wall with lights around it. The opened wall contains a healing atom, devastator ammo and steroids. The box itself contains a devastator.
4. In the second station search the "No Loitering" sign above the mailbox for a cubicle with RPG ammo.
5. From the mailbox, go to the dark stairway and search the wall to your left just as you enter, to access a secret room with freeze thrower ammo. At the Galaxy map there is an alien switch to the right. Press the switch to open another area for RPG ammo and a devastator. The girls in this room "are just there for the ride".
6. Lower the left bookcase in the red keycard room by jumping from the top of the left bookcase to the top of the right bookcase. The left bookcase will lower to reveal a room with RPG ammo and health packs.
At the top of the stairs in the blue keycard station is a wall with fire. To the left of the fire is a dark room with a healing atom and devastator ammo. Activate your night vision goggles to see "TellTale Footprints", now turn around and look at the stairs to see the BattleLord's footprints leading to secret #5.
In the red keycard access room, explode the wall to the right of the right-hand side bookcase to gain access back to the train track area.
1. In the apartment next to the "Guilty" sign, search the painting above the sofa for a freeze thrower.
2. Shoot all the bottles in the same room (A pipe bomb should work nicely) and jump into a false wall behind the bottle shelf for a medkit.
3. Enter the 1st door on your left as you enter the KTIT radio station building at the top of the stairs. Go through the red curtain in the broadcasting room to access the rear stage with freeze thrower ammo and atomic health.
4. Open the door in the KTIT monitors room to access the red keycard. This also counts as a secret area.
Blast open the crack in the wall of the apartment where secrets #1 and #2 re to gain access back to the starting point.
In the same apartment room, use your night vision goggles and look at the dark wall to the left of the crack, it says" Blast the Bottles" referring to secret #2.
Use the microphone in the KTIT broadcasting room to listen to Duke say why he always listens to KTIT radio!
1. Search the wood panel wall on the 2nd floor bar area for a medkit, scuba gear and RPG ammo.
2. In the same room, search the wine rack for a holoduke.
3. Jump into the fountain near the swimming pool between the 2 flaming urns. You will be transported to a South American jungle. Go straight ahead and you will see a bloody handprint on a wall. To your right is a freeze thrower. Press the handprint and get ready to meet Dr. Jones (Indiana Jones that is! - You do remember what happened when Dr. Jones tried to take the golden idol don't you? !!!)
Misc Info - In this jungle behind the palm trees is the entrance to the SECRET LEVEL - Freeway (Level 11) Use a pipe bomb, RPG, or Devastator to clear the palm trees away to access the secret level Nuke button.
In the receptionist desk area with mailboxes, is a disconnect switch just inside the doorway. Operate the switch to open the wall on the opposite side of the room to the left of the security monitor. Inside you'll find night vision goggles.
Underwater in the swimming pools shallow end (Opposite the diving board) is a crack on the wall that can be exploded to open a passageway back to the washroom to get atomic health.
There is a vent shaft in-between the two rooms on the second floor. Enter the vent duct to get a shrinker.
Take the stairs (Not the elevator) to the second floor. Go to the corridor to the right where you'll see fire extinguishers on the middle of the wall. Shoot at the fire extinguishers so that the wall explodes open. You will be able to access 2 healing atoms on the black granite ledge. Continue around the corner of the ledge to get Devastator ammo.
In the dark corridor next to the entrance to the pool, is a very dark corner wall. Activate your night vision goggles to see "Behind the Fountain" referencing secret #3.
In the bar area (See secrets #1 and #2) the wood paneled refrigerator doors open to reveal health packs.
Opposite the end-level Nuke button is a crack on the wall. Explode the crack open to allow you to get back to the starting point.
To defeat the Cycloid Emperor, jump up onto the ledge surrounding the football field. Using a RPG or Devastator, look up to see a "Duf Beer" air balloon. Once the balloon explodes you'll be in power-up heaven! (Hint: If you strafe and crouch the freakin one-eyed idiot can't hit you) Now it's time to relax for some R & R ;)
1. Open the corner wall with lighting on either side in the Alpha area for devastator ammo, pistol ammo, and a shotgun.
2.
3.
4.
1. Go to the end of the freeway that has a concrete faced building (Not the black granite building). Jump up to the left ledge and search the window at the far left of the building. The window opens into a room with a freeze thrower.
2. On the upper level freeway, search the window in the alcove opposite the blue keycard access. This window opens to a room with a shrinker and devastator ammo. Go to the top of the stairs and blow open the door to re-enter secret room #1.
3. Blow open the crack in the door behind the blue keycard for freeze thrower ammo and a chaingun.
4. Search the bookcase near the blue keycard where the ceiling has collapsed for devastator ammo.
5. In the building with the conveyor belt, jump into the black and yellow striping on either side of the granite column for a secret room with pipe bombs.
Behind you at the starting point is a wall under the water with a crack on it. Explode the wall open to reveal atomic health, a shotgun, and ammo.
Near the blue keycard access building is a building with black windows that has collapsed. Jump up onto the sloped building and find a hole in the middle. Jump into the hole to get devastator ammo, a jetpack, shotgun ammo and a health pack.
In the room where the blue keycard is, go to the window next to the large bookcase. Jump down onto a ledge with lights to find 2 healing atoms.
Follow the conveyor belts in the blue keycard access building to a metal crusher. Crouch inside the crusher to see a flattened "Terminator" ala Arnold Schwartznegger's film. Duke exclaims "Terminated".
Misc Info - The overturned police car near the red cardkey access is in reference to an old show "Car 54" - Car 54 where are you ?
A slow, but easy way to get health is to drink some water. In order to do this you'll need to kick or shoot at a fire hydrant, a toilet, or a urinal. That will cause it to break and water will spill out . Stand close to the water and drink by pressing the open button or key. This also works with water fountains or decorative fountains in parks, etc on various levels.
A great way to obtain 10 health points is to use the bathroom. All you have to do is stand next to a toilet or urinal and press the open button or key. This will cause Duke to say "Ahhh... much better" and give you 10 health points. Note: You will not be able to do this again until you have taken more hits to decrease your health point level.
The laser trip mines can be set off with the RPG, Devastator or another pipebomb.
[
Return to Index]![]()
In the level one bathroom a telephone number is on the wall by the urinals. Is the number purely random and just to generate an obeisance? Nope, the number, 867-5309 is from a song. The song is called "Jenny" by Tommy Tutone. "Jenny" was a song about a guy who saw Jenny's number on a bathroom wall and kept bugging her.
There are three lines that Duke says that are references to Evil Dead 2 and Army Of Darkness. First, one of the level setting is "Come get some". Another is, sometimes when Duke picks up a weapon he says "Groovy". Finally, often he says "That's gotta hurt," when he hits an enemy with RPG. In addition to saying these lines, Duke uses a raspy voice similar to that of Evil Dead 2 and Army Of Darkness.
In level three near the end you'll see a sunken submarine. If you look close enough you'll notice the name of the sub is USS DALLAS. That is a reference to Tom Clancy's movie/book "The Hunt For Red October". The central US sub hunting for the soviet sub "Red October" was called the "USS Dallas."
Level three takes you to a prison cell. In one of the prison cells there is a poster of a girl. However, the poster is transparent and you can walk right through it. That reveals a hidden tunnel which leads out of the prison. Following the tunnel is a great deal of sewage. This is a reference to the movie/book "The Shawshank Redemption." Stephen King was the author of the book. The movie stared Tim Robbins and Morgan Freedman.
Often times through out the game you'll see a girl trapped in some slime. She says "Kill Me" which is a reference to the movie "Aliens." The voice of this character is that of Colleen Compton, one of two female employees at Apogee/3D Realms.
See the individual level listings above for
more references.
In the beginning of level one a large billboard style sign over looks the area. The sign reads "Innocent ?" which is a reference to how some people feel on the O.J. Simpson verdict.
The TV at the far end of the bar in level two shows a famous chase scene. On the TV is O.J. Simpson's white Bronco being chased by a police car.
Perhaps the most unexpected reference you'll see is the space marine. He can be found behind the cross in the level three chapel. To get there, first, shot the glass to the left of the cross. Then, activate the switch on the altar. This will cause a hidden door to open behind were the glass once was and also turn the cross upside down. When you go through the door you'll soon be attacked by an octabrain. Once you defeat the octabrain, you'll be able to continue walking down the hidden tunnel. At the end is a person caught in green slime and also with his legs cut off. Duke's reaction is "That's one DOOMED space marine." Clearly a reference to ID's DOOM, which is probably the best known 3D action game.
In level 5 there is a "Dopefish Lives" message on the bottom of the first pillar leading up to the space ship. The Dopefish a character that originally appear in the Commander Keen series. Those games were put out by Apogee and ID. A good argument can be made that Apogee and ID's claim to early fame was the Commander Keen series.
See the individual level listings above for more references.
[
Return to Index]![]()
E-Mail me at sdudek@frontienrnet.net and request a copy.
I'll post it to alt.games.apogee and comp.sys.ibm.pc.games.action at least twice a year.
Here's a list of few sites you can find it at:
| www.your-site-goes-here.com (Don't Click on this link - It's a dummy) |
If you have the FAQ at your site and wouldn't mind it listed here please let me know. My E-Mail Address is: sdudek@frontiernet.net
![]()
This page is maintained by SteveDude himself.
Duke Nukem 3D and all related graphics on this page are © 1996 3D Realms Entertainment,
Garland, TX USA. 3D Realms Entertainment is a division of Apogee Software, Ltd.