Otherwhen
Junior Officer Lesson 4: Hunting and Shooting
The purpose of this lesson is for ye to learn how to select targets to attack, and how to disable the brigands so that ye have a better chance of winning the melee.First ye read this entire post, then ye practice each item that be marked
When ye have practiced everything enough to be comfortable doing it (including loading at least one gun), ask a training officer to schedule yer lesson 4. Please read carefully.
CHOOSING TARGETS:
Ye have probably noticed that when yer ship be close to another ship at sea, the name of that ship shows on the right of yer screen. Near the bottom, where it normally says "Water Sleeps" on one of our boats, it will either say "Brigands" or "Merchants" or "Independent" or the name of a flag. Brigands and Merchants be bots only. If it says the name of a flag then there be at least one human aboard. If it says "Independent" then either it be a human ship or it be a Navy ship.Near the top where we see "Scurvy Dogs" on one of our boats, it will give the PVP rank of the ship. Sailors be easiest, Mostly Harmless next easiest. The hardest two be Sea Lords and Imperials. In between there be Scoundrels, Scurvy Dogs, Blaggards, and Dread Pirates. Ye will probably get more booty if ye win against Sea Lords or Imperials, but ye be far more likely to lose, too, and more likely to get yer ship shot to pieces and have to limp it to port.
The most important information be the color ring around the icon of the ship itself. Never ever attack a dark blue ship. These be ships that are too much weaker than ye be, and ye will likely win the battle - but then later the skellie ship will attack ye. The skellie ship will be enormous and outnumber ye at least 3 to 1, with each skellie using a skull dagger. It will blast yer ship full of holes, and then after they cream ye in the melee, it will take all yer booty and all the contents of yer hold. Take me word fer it, this is not fun.
Light blue ships should be avoided. I hear that if ye attack too many of them then the skellie ship shows up, but I've attacked a few (only once in a period of days, when I just couldn't find any greens) and only gotten a warning message.
Green ships will have about the same number of crew aboard (counting the bots) as ye do. It can be a few more or less, but it be roughly the same. These be the ones ye want to attack.
If ye be good at Battle Nav and have lots of cannon balls aboard, ye can tackle yellow or orange or red ships. Yellow be possible and sometimes a Yellow ship will attack ye. With orange or red ships, ye really need to be able to put a lot of shots into them without getting shot yerself. Otherwise they outnumber ye too much.
HOW TO PURSUE:
Ye can press the attack button when the ship shows on the right, from any duty station or even if ye be lazin. If ye be actively hunting, ye will either be on radar or in the crow's nest. (See below) If yer ship be going too fast, ye can click the Turn About button once or twice. Please note that ye will lose speed doing this, so if ye just be impatient on the ship catching up to ye, don't do it. (do not practice this until after ye pass the lesson)Another way to get close enough to engage is to wait at a league point for him to catch up to ye, then set sail and attack right away.
RADAR:
Radar is possible anywhere ye can chart yer course, including the chart table belowdecks, the helm, and the map of the world that be in yer booty pocket. Where ye chart yer courses there be little magnifying glasses. Click the one with the + on it a few times, and ye will see all the ships that be inside the big white circle it shows. This is known as radar. This will show ships farther away than the crow's nest, but the only info ye get is the color, position and direction (and if ye watch fer a bit, speed). Ye can't tell if they be Navy or Imperials. If ye see a green that looks promising, go up to the crow's nest (or just close the chart if ye be up in the crow's nest already, using the map in yer pocket).
CROW'S NEST:
When a ship shows, click it immediately. Ye will see the same info on the right as if it were very close to ye. If it be a human ship ye can very quickly type "/vwho" and the name of the ship (that be / V W H O all together). This will tell ye the names of the pirates aboard but not the bots. It doesn't work with brigand ships or merchant ships or navy ships. If there be multiple ships with the same name, it will show all of them and ye will need to look at the location of each ship to decide which be the one near ye. Fer now, just practice this, because it doesn't help against brigand ships.
When a ship be human, ye can also type /who and then scroll down the alphabetical list of human ships currently at sea. This will tell ye the number of humans and the name of the current commander of the vessel. This be very useful if a human ship attacks ye - ye can send the commander a tell, begging him to not shoot yer ship full of holes.
ATTACKING:
(do NOT practice this until after ye pass the lesson) If ye find a brigand that ye want to attack, press Attack. Then ye have to get yer ship close enough to the other ship. Most of the time, ye can just wait and it will happen. Other times ye will need to Turn About or move more crew to sails. While ye wait, double check that the guns be loaded and the hold has plenty of shot.SHOOTING:
If ye get a hit or two on a sloop then it will be easier to win the melee. Six shots on a sloop be maximum damage, so don't bother with more. Cutters be maxed at 8 shots, and a single shot probably won't show as any damage in the melee. Be aware that if ye do a lot of shooting then ye will need to spend more coffer poe on restocking, but don't worry about it too much.If ye get attacked but don't have yer guns loaded yet, then ye can either go fer a quick grapple, or else run until ye have a bit of breathing room and load a gun at a time, then set up more moves.
There be four turns in an hourglass. A fully loaded sloop has four shots, and a fully loaded cutter has eight shots; but fer either one ye can only fire four times in an hourglass (unless ye want to try to waste shot by firing off both sides at once).
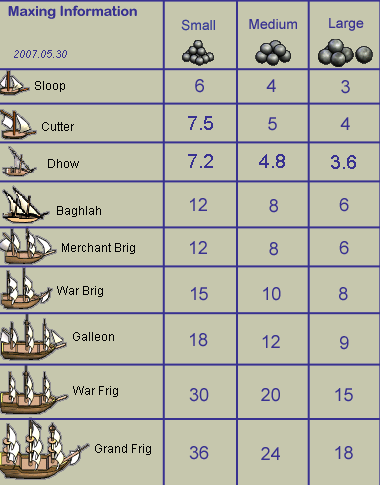
Sloops and cutters fire small cbs. Brigs fire med cbs. Galleons and frigates fire large cbs.
Max damage means that when ye get to the melee, yer opponent's boxes will be half filled with black rocks. This makes it a lot easier fer ye to win the sword fighting part. Even one hit on a sloop will result in a row of black boxes at the bottom. One hit on a cutter probably won't show - ye needs at least 2 fer it to matter.
Ramming into rocks or other ships makes about half as much damage as getting hit with a cannonball. This isn't pinned down though, and it seems to make no difference whether it be yer ship doing the hitting.
DAMAGE:
If ye be damaged from a previous battle, it does not count against ye in the melee, but does make it harder to get sail tokens. Just the hits in the current fight result in the black rocks at the bottom of the melee screen. If ye get hit, and then dodge while yer carpers fix the damage, ye will still have black rocks at the bottom of yer boxes. If ye get hit bad, then try fer a disengagement: avoid yer opponent, stalling until ye get a chance to disengage. If ye be going fer disengage, then do not fire and do not grapple and do not ram. If a brig hits ye with medium cannonballs, then it only takes 4 to max damage yer sloop, and only 6 to max damage yer cutter. Do not let brigs hit yer sloop or cutter!!!FIXING DAMAGE:
If ye take damage in a battle, and ye do manage to run away from the enemy, ye do not have to click disengage as soon as ye can. If ye be pretty far from him, stay in the battle and fix the carp and bilge, and reload guns. Then disengage when the ship be ready to battle the next brigand that comes along, or else when the current one starts getting close to ye again.MOVING THE VIEW:
It took me weeks to find out that ye can move the view of battle. Just click and drag on the view. This way ye can see where the rocks and edges be, and where the opponent is.TOKENS:
Ye earn movement tokens by yer sailors doing well on their sails puzzles. Ye start out with quite a few, but they age. After 5 turns they vanish on ye. If ye hover yer mouse above a token, it will show how many be at which age. A number that be red will disappear on the next turn. If ye needs a particular type of sail token, then unclick "Auto Sails" and then click the radio button next to the type ye needs. Remember to click "Auto Sails" again after ye gets it, or else keep selecting the type ye needs next - otherwise ye will be wondering why ye only get straight tokens and no turns.It be best to not use 4 sail tokens in the same turn, unless ye really need em. Yer sailors probably can't earn ye more than 2 a turn, and ye will run out of sails.
PLACING TOKENS:
Ye don't have to drag the sail tokens, cannons, and grapples to the diagram of the ship. Just click in the spot it will go. Sail token spots cycle between all three directions and none, and cannon spots cycle cannons, grapples, none. If ye wait until the hourglass be almost finished, ye can surprise yer opponent by having more moves than he be expecting - however be warned that changes made at the last moment don't always take.RANGE:
Cannon shot travels 4 blocks and then sinks. If there are three empty squares between yer ship and the other one, then the shot is wasted. This is bad if ye did the firing, but good if yer opponent did. So if ye be trying to get behind yer opponent to blast him where he can't shoot ye, then circle him keeping that much space between ye.ATTACKING LARGER SHIPS:
If ye be fighting a ship larger than ye, such as a brig, and it be green or yellow, then odds are it will not have enough crew aboard fer the sails. Run it in circles a bit for at least 6 turns, avoiding getting hit. This should use up most of its sails. Then sneak up behind it and blast it full of holes before ye grapple it. Ye might have to blast a few times, then run away fer a bit, then come back again. Be sure to avoid the sides of the ship, so that he doesn't hit ye.ATTACKING SMALLER SHIPS:
If ye be fighting a ship smaller than ye (such as ye in a cutter fighting a sloop) then make the battle short (less than 6 turns) - otherwise ye will run out of sails.MELEE TIPS:
Most of the time ye want to team in 3s, and take down the yellow names with captain hats first, rest of yellow names second, green names third, then white names. When names be the same color, take out the skull daggers and scimitars first and the foils last. It be hotly debated whether cleavers be more dangerous than skull daggers or not. Choose yer strategy and remind yer crew right before the melee starts.When ye be attacked many to one in the melee, stop using the space bar. This keeps those many opponents off yer mates fer as long as possible. If they keep at ye, then ye will go down, but mebbe by then yer mates will have picked off all the others.
Every few turns, don't use the space bar - use that time to recheck yer teaming and look fer important messages.
When ye be fighting a green brigand and ye be not damaged but have him at max damage, then teaming in 2s is most likely better. This finishes them all off more quickly. Fer that matter, if he's maxed and ye aren't, then just having yer side stop using space bars entirely will likely give the brigands time to kill themselves off! If it be yellow or orange brigands then ye might want to stick to 3s even if they be max damaged. Please note that Imperial brigands will always team on ye, and often so will Sea Lords and Dread Pirates.
Why not team in 4 or more? Because they slow down the same way ye will if ye follow these instructions. And it leaves too many of them unattacked entirely so they can sneak up on ye.
With most swords, ye need to make blocks and not just send sprinkles. Pick two or three colors that ye seem to be getting a lot of, and gather them into blocks. Sprinkle the rest away as soon as ye get breakers. Watch what color the sprinkles and swords turn into and try to build yer blocks of those colors in the same columns. This lets ye send a sword right back at him if ye get the right breaker.
If ye be on an opponent who is close to being knocked out and ye break a big block, switch immediately to another opponent. If the opponent be going slowly, then it will take several turns before yer big sword knocks arrives to knock him out, and any other swords after it would be wasted. If it looks like he be recovering, ye can switch back again.
When fighting humans, ye can target some nobody with yer sprinkles while 3 of yer mates attack the captain, then when ye get a chance to send a big sword, quickly switch to the captain to send the sword.
When nobody be attacking ye, then use the space bar a lot. Send as many swords as ye can, and even switching between opponents if it seems a good idea. As soon as ye get attackers on ye, then slow down.
OOOPS!:
If ye accidentally attack a human ship, then use /vwho or /who to find the name of a human aboard her, and send a tell apologizing. Explain that ye be in training and not allowed to attack human ships yet but that ye goofed, and ask to be allowed to disengage. If the other ship says no, be prepared to lose and get yer ship shot full of holes. If he does not shoot yer ship full of holes, then thank him fer it after the battle be over (whether ye win or lose).THE LESSON:
After reading the above, ask fer JO Lesson 4. Be prepared to answer questions on the lesson and demonstrate the use of radar and crows nest, and then ye will have a duel against a training officer. For the duel, two sloops will start out with empty cannons, and only six cannonballs aboard each. Dueling sloops will be solo with bots. Ye be required to fire at least one gun, but ye can pass the lesson if ye miss the other ship with all yer shots.
PERMISSIONS:
After passing this lesson, ye will be given permission to attack brigand and merchant ships, but not human ships. Ye have permission to load the guns and fire them as well, including again any human ships that PVP ye or in a duel with a crewmate or flaggie.