unisys12 |
| Hard-core CEG'er |
|
|
| Reged: 09/08/02 |
| Posts: 3944 |
| Loc: Corinth, MS | |
 CD4E FAQ CD4E FAQ
#655008 - 07/01/04 09:46 PM |
| |
I will start
off with the basic stuff, then work up to the more envolved
stuff!
--------------------
Phillip Jackson
`98 Mystique LS
262K+ and counting...
ATX rebuilt @ 151K
"This storm has broken me, my only friend!" RIP
Dime
Post Extras:    |
| unisys12 |
| Hard-core CEG'er |
|
|
| Reged: 09/08/02 |
| Posts: 3944 |
| Loc: Corinth, MS | |
|
CD4E
FAQ
-----------
General Questions -
What's the
most commonly used acronyms used when talking about transmission
repair with the CD4E?
A/T - Automatic Transmission
(rear wheel drive)
ATX - Automatic Transaxle (front wheel
drive)
ATF - Automatic Transmission Fluid
MLP - Manual
Lever Position sensor (aka Range Sensor)
TSS - Turbine Speed
Sensor (aka Input Speed Sensor)
VSS - Vehicle Speed Sensor (aka
Out Speed Sensor)
Will be updated with new
information as needed and
obtained.
--------------------
Phillip Jackson
`98
Mystique LS
262K+ and counting...
ATX rebuilt @ 151K
"This storm has broken me, my only friend!" RIP
Dime
Post Extras: |
| unisys12 |
| Hard-core CEG'er |
|
|
| Reged: 09/08/02 |
| Posts: 3944 |
| Loc: Corinth, MS | |
|
Maintaince -
Why should I change my ATF on regular intervals?
A lot of people think that you should not change your
transmission fluid unless you are having problems. This is about as
wrong as you can possibly be. Look! ATF is not some miracle fluid
that will not break down. When ATF breaks down, it actually becomes
abrasive. If you allow this liquid sand paper, if you will, continue
to run through your transmission... it will eat away at everything
it comes into contact with. Keep your fluid changed on a regular
basis, all those parts will continue to be happy for a long
time.
What kind of fluid should I use, when changing
my fluid?
The CD4E is designed to use Mercon. Not Mercon
V! This holds across all models years. You can use pretty much any
brand of multi-purpose ATF fluid. You will most commonly see it on
the shelf labeled as, "DexronIII/Mercon". These multi-purpose ATF's
also cover the same specs as Type H, which the CD4E may call for in
other countrys. If you want, you can use synthetic based fluids such
as, Mobil 1 Synthetic ATF or Amsoil Synthetic ATF. There are of
course others out there and I will let you do all that research. I
will let you draw your own conclusion in that area on what is best
for your CD4E. Just stay with either Mercon or a synthetic variant
and you will be fine. And yes, if you want to slowly change over to
a syn, by performing the 4 quart drop procedure, you can.
How do I change the fluid in my CD4E?
There's
two ways. The first way is a drain and fill approach and the power
flush. There is also a manual flush that I will also cover.
A)Drain and Fill - Jack the front of the car up a small
amount. Remove the drain plug, using a 3/8" drive rachet. Allow the
4 quarts to drain out. After the ATF drains out, simply re install
the drain plug and let the car down. Add 3.5 quarts and crank the
engine. Hold the brake and work though all the gears. This ensures
that all the fluid works through the system. Leave the engine
running and check the fluid level and adjust as needed. You should
only have to possibly add the last .5 quart.
B)Power Flush -
This procedure calls for a mechanic to hook your ATX up to a machine
that will force new fluid into the ATX case and, at the sametime,
sucks out the old. The force of the fluid coming into the case
cleans out most, if not all, contaminets throughout all parts of the
ATX.
C)Manual Flush - To perform a tranny flush yourself,
follow this little "How-To" by RoadRunner, Transmission Forum
Moderator at CEG. Before you start put 4 quarts of WATER in a bucket
and mark the INSIDE of the bucket with an INDELIBLE INK MARKER, at
the top of the water level. When you get under the car, you will see
two lines that go from the transmission to the passenger side of the
car. One attaches to the BOTTOM of the radiator, while the other
goes to the TOP of the radiator. Follow the line that attaches to
the BOTTOM of the radiator back to the transmission. This is where
you want to remove the line and then put the end of it into a
bucket. Pour out the water and dry. Now you have a 4 quart measure
inside the bucket ! Start the car and let it idle while the bucket
fills. When it gets close to the 4 quart mark, turn off the car, and
pour 4 quarts of ATX Oil into the Dipstick Tube. Take the 4 quarts
in your bucket and pour it into the 4 empty ATX Oil bottles. You'll
need to repeat this until the oil coming out of the line starts to
resemble the oil you ar pouring into the dipstick tube.
I've heard that performing any type of flush can cause
more harm then good. What's the truth to this matter?
Well see here is what happens with old ATF, while still
floating around in your tranny. The old fluid flows through the
tranny, causing all sorts of damage. One of the main problems is
scaring. Scaring is where a piece of grit runs through say, the bore
of the valve body. When it reaches the piston or valve, it gets
caught between the seal and the bore. As the valve or piston
continues to work normally, it is also cutting into the bore. Now,
with scaring out of the way - As time goes by, this scare will
become filled with other particles of grit and trash. This
eventually seals whatever leaks might have been caused by the
scaring action. Now! This is just one piece of grit, so imagine
thousands if not millions upon millions of different examples of
this happening throughout an entire trip! It does not take long for
your transmission to become riddled with this damage. Well, here's
the catch. ATF is naturally very good at cleaning. And if you flush
your tranny with 12 quarts of new fluid, it is only a matter of
miles before all those scares are cleaned out and you have a
hydraulic mess on your hands. Valves and pistons will begin to stick
or leak. Line pressure will fluctuate wildly. All sorts of problems.
It is not unheard of for someone to flush their tranny, that has not
taken very good care of it, and soon after flushing - it dies.
General rule of thumb here... Take care of it, from the
beginning, and it will take care of you.
What if I bought
my used and I have no idea how the former owner took care of the
transaxle?
If you have purchased a used car, that you are
not sure about the level of care that the previous owner car gave
the transmission, I would suggest performing the 4 quart drop
routine and not flushing the tranny, right off. Wait until you have
completely at least three of the drain and fill's first. After that,
if everything is working ok, then I would suggest a flush for your
ATX.
How often should I change my ATF?
With the drain and fill method, I would suggest at least
every 10-12,000 miles. A power flush should be performed, at least,
every 20-25K. Yeah. Most transmission repairmen will tell you that
this is overkill, but... we are talking about $10-$15 here! Would
you rather pay an average of an average of $20-$50 a year (given
that you drive an average of 30K a year) or $2500 over a week, while
your CD4E is rebuilt by some guy at a shop that you don't know
rebuilds something that you have no idea about?
How
do I change the filter in my CD4E?
The filter, in the
CD4E, is not a serviceable item. By this, I mean that the filter
cannot be changed without actually disassembling the transmission.
Don't go and get all upset about this! The filter actually works
pretty good. The only known problem with the filter, was found back
in `98, I believe. It was redesigned by Flitrek to address a fluid
flow issue during extreme useage. In other words, when you would
drive your car like a mad man - like most of us do on weekends, the
fluid was not able to flow properly through the filter. This lead to
premature failures of the coast & direct clutches. But if you
are running alot of horsepower or torque, then might I suggest a B&M External Filter.
--------------------
Phillip Jackson
`98
Mystique LS
262K+ and counting...
ATX rebuilt @ 151K
"This storm has broken me, my only friend!" RIP
Dime
Edited by unisys12 (08/04/04
10:17 PM)
Post Extras: |
| unisys12 |
| Hard-core CEG'er |
|
|
| Reged: 09/08/02 |
| Posts: 3944 |
| Loc: Corinth, MS | |
|
CD4E FAQ
----------
Modifications -
Modifications to the
CD4E are few and far in-between. Actually, modifying the CD4E
actually means building it up for better reliability. The weakest
point of the later model CD4E's found in the Contours is the torque
convertor bypass valve, located in the Valve Body. This valve was
poorly designed, but thankfully, Sonnax makes a replacement valve
that solves this issue. Actually, there are several weakpoints, as
with anything made by man, and the fact that there are several weak
points that can be addressed and when addressed properly, can
increase the overall reliability of the transaxle.
So what
about performance modifications? Well, there aren't any. The only
real performance mods you can do to the CD4E is take the Direct and
Coast clutch packs from the 98-2000 models, which host High-Energy
Kevlar Composite clutch plates, and the 2000 model CD4E found in the
Escape and Tribute also have a wider High-Energy band. Thes small
changes will help with overall clutch life, which takes us right
back to the fact that modifying the CD4E means modifying for
reliability and not so much for performance. Since I first typed
this, almost a year or so ago, Level 10 has released the PTS
clutch packs that they use when rebuilding their
high-performance CD4E's. I have many thoughts here, but since this
is a FAQ, I will leave it at that.
Below I will list of a
few of the more common modifications that can be made to this
transaxle along with how-to's were I can.
External
Cooler
An external cooler is a wise investment for any
automatic transmission, no matter what type! The number one killer
of any automatic transmission is heat. By adding an external cooler
will greatly decrease the overall operating temperature of the unit.
This will help in several areas like; fluid & clutch life and
operation.
So how can I install a cooler on my car? Well
here is a quick drawing that Hector (LoCoZ2.0 is his screen name of
the CEG forums) did for someone awhile back.
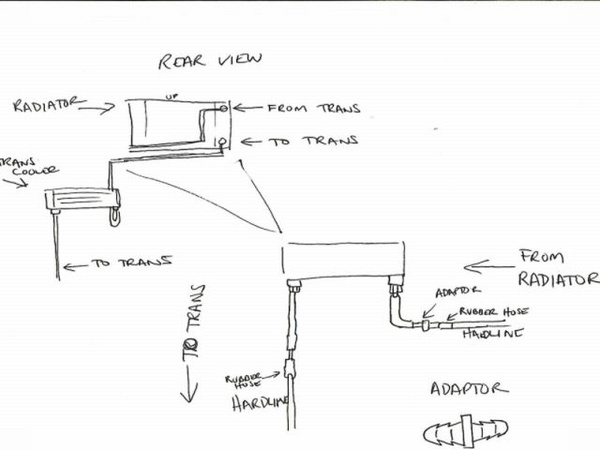
As you can
basically see, all you have to do is tap into the "return line"
coming from the radiator to the trans and place the cooler there.
Mounting the cool is really based on where you have room to mount
it. Just make sure that it gets plenty of air flow. Most place it in
front of the A/C Condenser. Most of the people that have installed
these have noted that mounting it here does not affect the overall
performance of your A/C.
This is actually a simple
operation, that most anyone could do themselves over a weekend. It
can also be done, most of the time depending on the brand and size
of cooler you use, for less then $100! Most only spend about $70 for
all the parts including all fittings. Not bad for something that
could easily save you several thousand dollars for a rebuilt
tranny!!
Full Synthetic ATF
"Not only have
we not had a single member lose a CD4E while using it, if they
started using it early enough, but the temperatures that these guys
run are just sick! One member has claims of, in the winter, 90
degree operating temperatures while driving on the highway when the
outside temps are 50 or below. City driving, under the same
conditions were around the 110 - 150 degree range. When the temps
are well above 50, normal operating temps were around 120 - 150
highway and city is around 175 - 200. The normal operating temp of
the CD4E is around the 220 degree range. Bear in mind that these
numbers come from the combined use of the full synthetic ATF and an
external cooler. AWSOME!!"
I will say again, do your own
research here. I cannot possibly cover every fluid manufactuer out
there and give you a straight answer. Do your homework and pick what
you feel the most confident with.
Shift Kits
"Plain and simple... There aren't any performance kits
available! The only thing on the market right now that has anything
to do with shifting for the CD4E is the TransGo CD4Ejr kit. This is
more of a problem solving kit that, when installed, fixes a bunch of
known weak points of the CD4E's hydraulic system. Most of the kit is
for the valve body. The valve body can be removed easily enough and
the kit includes all the needed bits for drilling out the valve body
where needed. Here's a link to the TransGo site, which you will
be able to better educate yourself on it's purpose. If you would
like to purchuse one of these kits, you can check Bulkpart.com. There's also a nice thread, located
here that contains a link to the instructions that
come with the CD4Ejr kit. That should help give you a head start on
what to look for in this project."
High Energy Clutch
Packs
"If the build date of your CD4E is pre96, you can
have High Energy clutch packs installed. In 1996, the coast clutch
replaced with the High Energy material and in `97 the Direct clutch
was as well. These packs are only available, for the Direct &
Coast clutches. High Energy clutches are clutches made with a Kevlar
Composite material. Raybestoes and Borg-Wagner both make aftermarket
High Energy clutches for the CD4E."
Now for
some random possibilities that I bet a lot of people will laugh at,
but it's just stuff that I have thought about. (uh oh! There I go
thinking again!!) 
Swapping Around
"Alright! So 3L swaps are all
the rage right now with the Contour and Cougar. So what if someone
did all the normal engine swapping, but instead of using a normal
CD4E, use one out of the Mazda Tribute. Well, you would not have to
find just a Tribute I don't think, but any 2001 or above CD4E would
possibly work. Anyway, my point here is that the Tribute has a
little more aggressive shift pattern that is better suited for
street use. You could then get a chip from Streetflight or someone
like that, which would accentuate that aggressive shifting even
more. Why not? Hey it is just an idea?"
Cooling
Issues
"We all know that the CD4E has some serious
cooling issue's. So how might we be able to cool the tranny even
better then the above mentioned method of stuffing a small unit in
front of all the other stuff that is down there already (power
steering cooler, a/c condenser and radiator). What if you took a
radiator from an SVT contour, which has a little better flow
characteristics then no-SVT radiator, and replace the stock one with
this. Then remove the a/c condenser, which would make more room for
a larger tranny cooler. This action would also remove the CD4Es
cooling system from the radiator, which would be a good thing. Even
if you had an external cooler installed and your engine overheated,
you could still run the risk of causing the ATF to become super
heated if the conditions were right. If you didn't want to go with a
Contour SVTs radiator, you could get a Focus radiator from Fluidyne.
I am not sure if it would be an exact fit, but something to think
about anyway and that is what all this is about."
How-To's -
CD4E Trans Temp Gauge Install
How-To
"Go to Summit Racing and get yourself a 5/16" Autometer
Trans Temp Manifold.
You can install this like I did, but
you've got to be extremely careful in your measurements, cause this
will come really close to your lower radiator hose. I installed my
temp sensor so that I could read the ATF oil temperature after it
leaves the tranny, but before it enters the radiator cooler. This
temp reading coincides with the same reading you will get using a
scan tool and looking up the TFT value. (Transmission Fluid
Temperature)
Only cut the ATX oil cooling line using a pipe
cutter. Do NOT use a hacksaw or a jig saw. You will introduce metal
shavings inside the pipe, or you will bend the pipe out of round.
Follow the ATX Cooler line from the top of the rRadiator
back to the transmission. Crack the fitting at the radiator and
remove the line. Crack the fitting at the transmission and remove
the line from the vehicle.
Following the directions that
come with the manifold, you want to leave about 1/2" - 1" of pipe
between where you cut the pipe, and the elbow behind the nipple that
fits into the radiator cooler. Mark where you are going to make your
upper cut into the pipe, mark where you are going to make your lower
cut into the pipe based on the manifold's directions. Fit the temp
sensor into the manifold using teflon tape to seal the threads. Fit
the couplings into the manifold using teflon tape.
Now using
a bolt and nut that will fit all the way through one of the mounting
holes on the manifold. You want to anchor about a 3' section of wire
using a terminal that fits over the head of the bolt. This is going
to become your ground strap for the sensor. Since the ATX Cooler
Lines are not all pipe, the portion of the pipe that attaches to the
radiator is isolated from the vehicle and not grounded.
Attach the compression fittings to the cooler lines and
assemble the lines to the manifold. Make sure that you position the
pipes as close to their original positions as possible. They don't
have to be exact, you can alwasy bend the pipes a little to get them
into the correct position.
Attach one end of the wire you
are running from the sensor to the gauge, at the sensor, also using
a terminal that fits over the bolt.
Reinstall the cooling
line. (When I reinstalled my line, a corner of the manifold was
pressing against my lower radiator hose. I had to remove the cooler
line and use a Dremel to cut enough material off the corner of the
manifold block so that it would not touch the lower hose.)
Attach the sensor wire to the gauge.
Cut accordingly
and attach the ground strap to a ground point on the radiator
support just behind the headlamps. You will see about two or three
black wires that are all attached to the support, just behind the
passenger headlamp, on the engine compartment side of the radiator
support. I used this point to anchor the ground strap.
That's it! Check the oil level of your transmission. You
will lose some oil when you remove the line, but it shouldn't be
more than 1/2 quart.
- Pete (Roadrunner) The offical
CEG CD4E Burner!!
CD4E External Cooler
Install
This way will save you from having to cut any of
your stock lines incase you are on a lease.
Parts List:
-Tranny Cooler From a post by Terry Haines: Terry suggested
either a Hayden 'Ultra-Cool' (#404 side connections) or a
'Rapid-Cool' (#678 bottom connections)
-About 6 feet of 3/8 inch
transmission hose. (Get longer if you're not sure or your cooler has
a bottom feed)
-2 hose barbs/adapters One male, one female
-4 hose clamps
-Teflon tape, or your sealant of choice
-Brackets
-Sheet metal screws
-Zip tie style holders to
hold the cooler (will probably come with the cooler, otherwise the
guy at the parts shop will know what you need)
-Zip ties
-Fresh tranny fluid
Tools needed:
-3/4 inch wrench
-3/8 inch ratchet
-Short ratchet extension
-8mm socket
-Scissors or utility knife
*Obligatory Disclaimer: I'm
not responsible if you ingest tranny fluid, it tastes nasty, but
you'll live, maybe, probably not. Tranny fluid does seem to make
good hair conditioner though. Also don't be dumb, and drop your car
on yourself. I'm not going to hold your hand through this install,
you'll have to figure out some for yourselves, but please ask
questions in the forum if you have any)*
Step 1)
Park on a flat surface, secure your car from rolling (don't be lazy
and just set the parking break, chock those back wheels) jack it up,
and put jack stands under it.
Step 2) Drain the oil from the
transmission through the drain plug. This will keep all the fluid
from pouring out of the cooler hoses and help with that fluid
ingestion part. Just use the square end of a 3/8 inch ratchet and
short extension, no sockets needed on this one.
Step 3) You
will probably need to remove some shield right now to access the
space behind the bumper. Matt and I didn't need to do this because
his 2000 didn't come with it. (matt, put a smiley here)
Step
4) Crack open a beer with your buddy.
Step 5) Place a pin in
the tab in the top of the radiator. (not necessary, we did the
install without it, but it's in the Ford manual so it's probably a
good idea) This is to keep the radiator from falling down when you
remove the bottom support.
Step 6) Remove the two 8mm bolts
that hold the lower radiator mount in place, and turn it around so
you can access the lower hose connector of the radiator.
Step 7) Undo the flare nut (3/4 inch) that holds the lower
tranny cooler return line in the radiator. Be prepared with a bucket
for the fluid that will pour out.
Step 8) Time for another
beer!
Step 9) Take your two hose adapters, using teflon tape
or your sealant of choice, put the adapters onto the tranny hose and
into the radiator. Make sure to use sealant, otherwise it will leak
and you'll have to do this all again (voice of experience here)
Step 10) Test fit your cooler, and cut the hose to length.
We routed them along the same path as the power steering cooler
lines. You may place it wherever you wish, we put it in front of the
AC condenser but not against it. You don't want to put the cooler
against the condensor or ps cooler, because then you will be heating
the tranny cooler and it wont do it's job as effectivly.
Step 11) The brackets we used were from a B&M cooler
kit, but you can find something similar at a hardware store. The
tops were bent over so that we could use sheet metal screws to
attach them to the metal behind the bumper.
Step 12) Grab
another beer and admire your handy work on those brackets
Step 13) Attach your hoses to the cooler and to the hose
adapters and clamp them in place. You might want to orient the hose
clamps so that you can undo them later with out removing the cooler.
You might need to pop the hard metal line for the tranny out of it's
holder and slide it sideways so the hose adapters can clear each
other and fit like stock.
Step 14) Attach the cooler to the
brackets, we used the black zip cord things that came with the
cooler, and used the foam pads to cushion the fins of the cooler.
Step 15) Secure the hoses in place, we used zip ties.
Step 16) Put the radiator mount back in place with the two
bolts.
Step 17) If you haven't already, put the drain plug
back in place, using some teflon tape to seal it up.
Step
18) Get your funnel out and replace the fluid you took out with 5
quarts of new fluid. (maybe a little more to make up for the fluid
that will be in the new cooler and hoses) If you run the engine
while doing this, the fluid will be circulated through the
transmission and cooler lines and not spill out of any vent holes.
This is a problem when refilling transmissions that are completely
drained and might not apply here, but it couldn't hurt. If you're
feeling ambitious (read drunk) you could replace all your fluid with
the hoses attached to the adapters and not the cooler.
Step
19) Take those jack stands out from under there, and drop, I mean
lower(!) the car back down. (not the voice of experience here, but I
like seeing the look on Matt's face when I suggest something like
this around his car.
Step 20) You guessed it, one more beer.
Unless you're going to go test drive the car, in that case skip all
the beers and have your sweetie make you some kool-aid.
Notes: This install went fairly easy for us, and looks very
clean. Its hard to tell that anything was done even from underneath
except for the bright shinny cooler. A black one would probably be
completely stealth. We only had a few problems. We ran into some
trouble when we were getting the new hoses onto the cooler, they
were a very tight fit. We tried heat, grease and stretching out the
hose with a larger bolt. In the end it just took time to get it on.
We also had some trouble getting to the flare nut on the radiator
until we moved the mount out of the way. We also put the cooler
inline after the stock one in the radiator. This will let the
radiator pull a lot of heat out of the fluid and let the new one do
the rest, as opposed to taking the heat out of the fluid and then
putting it back in when it flows through the radiator. This will
also help in the winter in that the fliud will be warmed up faster
in the radiator to get the tranny up to operating temp. All in all
this is an easy job that just about anyone could do, you just need a
little know how and a few simple tools. If you need help enlist a
friend, that's how I keep ending up working on Matt's car.
-
Chlorine & SpeedDemon (Dan & Matt)
A few things
I might add here... Another cooler that quiet a few people have used
is the B&M Super Cooler. This cooler comes in a kit that
includes all the necessary fittings and tubing that might be needed.
Bear mind that the Contour does have a slightly different size
fitting then most. IIRC, it is 5/16, so you might have to get the
fittings from somewhere else.
- unisys12
I
would also like to add here, that if anyone has anything that they
would like to add or any questions about this FAQ, please either
start a thread here about it or PM me. I am always looking to expand
on any information that I may have and I am not too proud to make
corrections.
--------------------
Phillip Jackson
`98
Mystique LS
262K+ and counting...
ATX rebuilt @ 151K
"This storm has broken me, my only friend!" RIP
Dime
Edited by unisys12 (08/22/04
08:18 PM)
Post Extras: |
| unisys12 |
| Hard-core CEG'er |
|
|
| Reged: 09/08/02 |
| Posts: 3944 |
| Loc: Corinth, MS | |
|
CD4E FAQ
----------
CD4E OBD-II Information -
TRANSMISSION INPUTS
The Analog Transmission
Range (TR) sensor provides a single analog input to the PCM. The
voltage corresponds
to the driver-selected gear position (Park,
Rev, Neutral, OD, 2, 1). This input is checked for opens and shorts.
(P0707, P0708)
The Turbine Shaft Speed (TSS) sensor and
Output Shaft Speed (OSS) sensors are analog inputs that are
checked for rationality. If the engine rpm is above the torque
converter stall speed and engine load is high, it can be
inferred that the vehicle must be moving. If there is
insufficient output from the TSS sensor, a malfunction is
indicated (P0715). If there is insufficient output from the OSS
sensor, a malfunction is indicated (P0720).
TRANSMISSION
OUTPUTS
Shift Solenoids
The Shift Solenoid
(SSA and SSB) output circuits are checked for opens and shorts by
the PCM by monitoring the
status of a feedback circuit from the
output driver (P0750 SSA, P0755 SSB).
All vehicle applications
will utilize an inductive signature circuit to monitor the shift
solenoids functionally. The ISIG
circuit monitors the current
signature of the shift solenoid as the solenoid is commanded on. A
solenoid that
functions properly will show a characteristic
decrease in current as the solenoid starts to move. If the solenoid
is
malfunctioning, the current will not change (P1714 SSA, P1715
SSB). The ISIG test runs in conjunction with the
other
transmission functional tests. The lack of communication between the
ISIG chip and the PCM
microprocessor is also monitored (P1636).
Torque Converter Clutch
The Torque Converter
Clutch (TCC) output circuit is a duty-cycled output that is checked
electrically for opens and
shorts by the PCM by monitoring the
status of a feedback circuit from the output driver (P0743).
The
PWM used to control CD4E's TCC does not have sufficient inductive
signature, therefore on these
applications the TCC solenoid is
functionally tested by monitoring converter slip. If the TCC is
failed on when
commanded off, a P1742 fault code will be stored.
If the TCC is failed off when commanded on, a P0741 fault code
will be stored.
Electronic Pressure Control
The EPC solenoid is a variable force solenoid that controls line
pressure in the transmission. The EPC solenoid
has a feedback
circuit in the PCM that monitors EPC current. If the current
indicates a short to ground (low
pressure), engine torque may be
reduced to prevent damage to the transmission. (P0962, PCA)
TFT - Transmission Fluid Temperature sensor. Used byt
the PCM to determines shift point characteristics based on the oil
temperature of the transaxle.
From the `98 Ford Service
CD -
"The MIL is illuminated for all emissions related
electrical component malfunctions. For malfunctions attributable to
a mechanical component (such as a clutch, gear, band, valve, etc.),
some transmissions are capable of not commanding the mechanically
failed component and providing the remaining maximum functionality
(functionality is reassessed on each power up)- in such case a
non-MIL Diagnostic Trouble Code (DTC) will be stored and, if so
equipped, a Transmission Control Indicator Light (TCIL) will flash."
What this basically means, is that the CEL will illuminate,
and stay that way, during an emmissions related electrical component
faliure or malfunction. That is until the PCM memory is either
cleared manually or the fault is not detected after two consecutive
drive cycles.
If there is a mechanical failure, in the
tranny, it will cause the TCIL (O/D light) to flash, which means
that the PCM has stored a code indicating which fault it was. But!!
This code will be cleared once the engine is turned off.
So.
If your O/D light flashed, there was a code there to be read. If you
turned your engine off before you could actually read that code,
that code would disappear. If when you started your car again and
the CEL was not on or the O/D light did not flash, there is nothing
there to read. You will have to wait until the fault happens again.
--------------------
Phillip Jackson
`98 Mystique LS
262K+ and counting...
ATX rebuilt @ 151K
"This
storm has broken me, my only friend!" RIP Dime
Edited by unisys12 (07/26/04 09:27
PM)
Post Extras: |
| unisys12 |
| Hard-core CEG'er |
|
|
| Reged: 09/08/02 |
| Posts: 3944 |
| Loc: Corinth, MS | |
|
CD4E
FAQ
----------
CD4E Differences -
Clutch
Plates
94-95 Friction - Direct
96-Up Friction - Direct /
High Energy material
94-96 Coast Clutch
97-Up Coast Clutch /
High Energy material
94 Steel - Direct - .078 - 3/4(qty)
95-96
Steel - Direct - .118 - 3(qty)
Pressure
Plates
94-97 Coast
98-Up Coast (redesigned)
94-98 w/o
Forward Wave Plate
98-Up w/ Forward Wave
Plate
Hard Parts
94 Pump Gears - .567
thick
94-Up Pump Gears - .603 thick
94-96 Pump Wear Plate 1st
design
97-Up Pump Wear Plate 2nd design (will retro
back)
94-98 Input Sprag - Wide Sprag (up to 1/98)
98-Up
Input Sprag - Narrow Sprag (from 1/98)
Drive Chain:
94-Up
2.0L Ford Contour - 3/4" Wide - 45 Links - E.T. Guides - 55T
Drive/50T Driven
94-99 2.5L Ford Contour - 1" Wide - 46 Links -
E.T. Guides - 55T Drive/54T Driven
00-Up 2.5L Ford Contour -
3/4" Wide - 46 Links - E.T. Guides - 55T Drive/54T Driven
94-Up
2.0L Mazda/Probe - 3/4" Wide - 46 Links - E.T. Guides - 55T
Drive/54T Driven
94-96 2-4 Servo Piston (1st
design)
97-98 2-4 Servo Piston (2nd design) 4mm Shorter
94-96
Servo Spring (1st Design)
97-98 Servo Spring (2nd Design) Green
in color
94-98 Coast Clutch Piston (1st Design)
98-Up
Coast Clutch Piston (2nd Design)
94-98 Drum -
Forward/Direct
98-Up Drum - Forward/Direct w/Forward Wave
Plate
94-98 Spring - Forward - Piston Return - 1st Design -
(to 1/98)
98-Up Spring - Forward - Piston Return - 2nd Design -
(1/98-Up)
94-98 Piston - Forward - 1st Design - (to 1/98)
98-Up Piston - Forward - 2nd Design - (1/98-Up)
94-96
Valve Body - Various Models
97-Up Valve Body - Various Models
94-Up 55T/50T - .625 Wide - 26T Sun Gear - 2.0L
Contour
94-Up 55T/54T - .625 Wide - 26T Sun Gear - Probe, 2.5L
Contour 00-Up
94-99 55T/54T - .855 Wide - 26T Sun Gear - 2.5L
Contour
Electrical Components
94-97
Sensor - Input (Pump) Beige w/green connector
(Probe/Mazda)*
94-Up Sensor - Input (Pump) Beige w/black
connector (except Probe/Mazda 94-97)*
94-Up Solenoid Block
Assembly - High Resistance (this will retro back, but older low
resistance will not)
*The Input sensor (aka turbine speed
senosr) current part number is 1S7Z7M101KA. This covers all models
of the CD4E.
--------------------
Phillip Jackson
`98 Mystique LS
262K+ and counting...
ATX rebuilt @ 151K
"This storm has broken me, my only friend!" RIP
Dime
Post Extras: |
| unisys12 |
| Hard-core CEG'er |
|
|
| Reged: 09/08/02 |
| Posts: 3944 |
| Loc: Corinth, MS | |
|
CD4E Links FAQ
--------------
CD4E Related Links and Iformation -
Company Produts -
Sonnax
www.transmissionspecialty.com/TB/TB-Volume02-01.pdf
- Has a host of information about the CD4E and products to fix
several things.
http://www.transmissionspecialty.com/TB/TB-Volume-09.pdf
- Drum overheating due to worn valve body wear or sticking pistons.
http://www.transmissionspecialty.com/parts/DM/CD4E.htm
- A whole list of parts kits Sonnax has to eliminate known problems
with the CD4E.
SPX Filtran
http://www.spxfiltran.com/bulletins/toledo/techbulletin.asp?num=046
- Coast Forward Clutch Piston
http://www.spxfiltran.com/bulletins/toledo/techbulletin.asp?num=047
- Early Pump Plate Gasket disclaimer
http://www.spxfiltran.com/bulletins/toledo/techbulletin.asp?num=048
- Revised CD4E Pump to Stator Plate
http://www.spxfiltran.com/bulletins/toledo/techbulletin.asp?num=049
- Pump Body Seperator Plate Warning
CD4E Related Websites
-
http://www.dustbury.com/626/trans.html - The first
site I found on the internet with good information that was easy to
read and understand. Very good information here.
The A-Team -
Site related to the Ford Probe, but they have a lot of good info on
the CD4E as well.
Probe/626/MX6 FAQ - Lots of really good
information about cooling products here!
CD4E Shopping Experience - This is a thread that
contains a lot of research that I did after my CD4E died. This is
thread has lots of links and information in it as well.
How-To's -
http://www.fastcougar.com/forums/messageview.cfm?catid=14&threadid=70919
- Fastcougar's How-To on changing the TSS, with part number and
pics.
ATX Rebuild Picture Story - btartman's rebuild
pictorial of his `95 CD4E. Lots of great info all thoughout!
--------------------
Phillip Jackson
`98 Mystique LS
262K+ and counting...
ATX rebuilt @ 151K
"This
storm has broken me, my only friend!" RIP Dime
Edited by unisys12 (03/27/05 07:53
AM)
Post Extras: |
| unisys12 |
| Hard-core CEG'er |
|
|
| Reged: 09/08/02 |
| Posts: 3944 |
| Loc: Corinth, MS | |
|
VSS
(Vehicle Speed Sensor)
I had to change my VSS late this
afternoon, so I thought I would walk you guys through the process on
my Duratec/CD4E. It's really not all that bad, except unplugging the
connector. My symptoms were pretty simple... Bouncing/in-accurate
seedo and once that was bad enough, the tranny would not shift
properly.
- Secure the vehicle, in the air, safely. 
- Remove your air
cleaner & tubing.
- Reach down, under the brake booster,
and locate the VSS connector. You can actually see it better from
the bottom, just no way to actually reach it from there. It will
take some serious single handed twisting to disconnect this
connection, but don't give up!
- From under the car, use a
5/16" wrench to remove the single bolt from the VSS retainer. * Note
that this retainer looks like it is upside down, with a tab resting
on the case of the tranny. Don't fret! This is normal, but be sure
to replace the retainer in the same way that it was
removed.
- Grasp the sensor body and lightly wiggle it out of
it's location. Use gently force when wiggling, but apply steady
pressure upwards. The sensor body should slide right out. Do not
jerk upwards on the sensor, when removing it, or you will run the
risk of gear coming off the end of the sensor. This is not a real
big deal, since the gear itself is about an inch tall. Along with
the added shaft that is part of the gear, the gear assy is probably
around 4 inches long. You should be able to grasp it with a pair of
crooked needle nose pliers, but it would be one hella tight
fit!!
- Once the sensor is out of the case and you have
removed the gear assy from the sensor body, use a rag to wrap around
the body of the sensor base. This part of the sensor is metal, so we
don't want to damage it. Use a pair of pliers and grasp the metal
part of the sensor. LIGHTLY! Do Not Squeeze Hard!! Just apply a
small amount of pressure here. And use a 1" wrench on the plastic
part of the body and seperate the two halfs.
- At this point,
you get simply reverse. But something that I should note here...
There is a seal on the metal half of the sensor base. Be sure to
inspect this seal closely or better yet, just replace it. Also, be
sure to clean everything really good and lube everything down with
CLEAN ATF before putting it all back together.
Part number of
the sensor - F-F5RZ-9E371-BC
Cost of part - 44.67 + tax =
47.80
Part was purchused from local Ford Dealer
Reason
for sensor replacement - Notice about a week ago that when traveling
over bumpy roads, that my speedometer would fluctuate +/- 5mph.
Monday, of this week, it progressivly got worse (of course) and the
speedo would actually stay at 0 when taking off from a stand still,
as well as droping to 0 when I let off the gas. In only 60 miles of
driving, on that day, it managed to toast the ATF I had in there,
which only had about 5K on it. Yes, I have also changed my ATF as
well.
Results - 
by Phillip
(unisys12)
------------------------------------------------------------
--------------------
Phillip Jackson
`98 Mystique LS
262K+ and counting...
ATX rebuilt @ 151K
"This
storm has broken me, my only friend!" RIP Dime
Post Extras: |
|

 Flat
Flat  Threaded
