Well, I'm not going to dwell too much on this part of the process, since it is covered in my LT17 building journal, and many other builder's pages. Here are some of the high points:
The nesting pattern
Plywood comes in 4 by 8 foot sheets. I need plywood 18 feet by 8 or
10 inches. So, I figured an appropriate way to cut the sheets into strips,
and re-join them. It was important to me to put the bottom panels on one
sheet, and the side panels on another sheet for a couple of reasons. First,
I will get a better looking panel if all of the pieces came from the same
tree. Second, future boats may be built from different thicknesses of plywood,
for example, 4mm bottoms and 3mm sides. So I drew the nesting pattern so
that 1 sheet of plywood yields the bottom panels, and another makes the
sides.
Divide and rejoin
I cut the plywood according to the nesting diagram. I then cut 8:1
scarf joints in the panels. I won't go into much detail here, but I used
a technique described by Chris Kulzcycki in his books and building manuals.
Since my last boat was a kit, this was my first experience cutting scarfs
in plywood. It was not difficult, but it was helpful that my block plane
was "scary-sharp". The segments were then joined into full-length panels
using epoxy thickened with silica. Thus, I brought home 2 pieces of wood,
sawed it into 12 pieces of wood, and glued it back into 4 pieces of wood.
The Forms
I grabbed some plywood left over from a home-improvement project, and
made some building forms. I had my drawings duplicated full size, and obtained
an extra copy of the forms drawing. This I cut out and glued to the plywood
using spray-on glue. Next, the forms were cut out using the bandsaw. I
used short pieces of 2x4 to attach the forms to my building table.
|
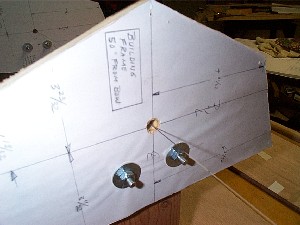
Here is a close-up of a form. I have drawn a centerline, and a horizonal line depicting the design waterline. At the intersection, a hole is drilled. Then , a piece of monofilament fishing line is passed through all of the holes. As long as the string keeps in the bullseye, the hull is straight, right? I figured that this method of alignment was usable whether the hull was on the strongback, or removed from the strongback for inside work. |
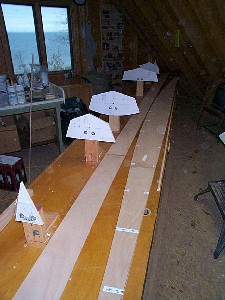 |
The obligatory forms picture. Here, a few forms are screwed right to
the bench, supported by short lengths of 2x4's. Next to the forms are the
cut side and bottom planks. Out the window, we see the 41 degree waters
of Lake Ontario beckoning. Brrrrr...
By the way, see the third form with the deck radius? I have no idea if that profile or height will work. |
Trial and Error
The panels were stitched together using 18 gauge copper wire. Here
is where the original offset table is put to the test. Numerous adjustments
were made, to get the panels to produce a fair hull. The adjustments were
made by planing the panels, or by using shims.
After many hours of fairing the hull, I took the whole thing apart. The wires were cut and the plates re-surveyed, to correct the offset table.
Gluing the Hull
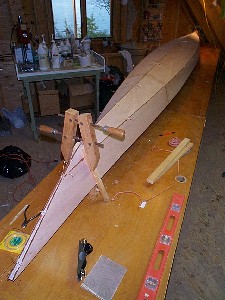 |
After the survey of the corrected offsets, the panels were re-assembled
on the forms. I decided to try a technique used by builders of Pygmy boats:
I applied tabs of thickened epoxy to the outside seams using a syringe.
I worked very well, and was neat.
In this photo, the inner stem can be seen. It is a wedge of 4mm okoume, wired in place. |
The Outer Stem
I decided that the hull needed stem pieces, for several reasons. First,
it is a way to get a little extra volume up high in the ends of the boat,
without affecting other dimensions. Second, I do not want sharp ends for
safety reasons. A sharp end bobbing up and down in waves could easily injure
a paddler, or hole another boat. Third, the blunt ends will resemble the
ends of the skin-on-frame boats on which this design is based.
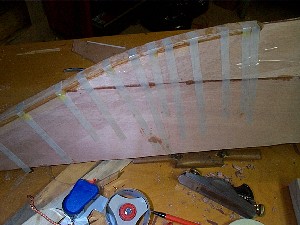 |
The block plane was used to flatten and fair the inner stems. The bow knuckle areas were then recessed a bit to accept the outer stems. The outer stems were fashioned with wedges of red oak, 1/4 inch thick. These were cut oversize, and then steam bent to match the curve of the bow and stern. They were glued using epoxy thickened with silica, and held in place with strapping tape. Later, the outer stems were planed and sanded to match the contour of the hull. This created outer stems that blend into keel strips. The hope here is that the hardwood will hold up better to launching and landing. |
Preparation for glass
The rest has been covered elsewhere. In summary: The wires were cut.
Internal fillets of epoxy thickened with phenolic mirco-balloons were applied.
The remaining holes were filled with epoxy thickened with wood flour. Everything
was sanded smooth and fair. Okoume dams were fabricated to house the end
pours, and epoxy leftovers were thickened and disposed of there. Three
inch, nine ounce e-glass tape was applied to the seams on the inside of
the hull. Then the hull was precoated with a thin coat of epoxy, and glassed
with 6 ounce cloth the next day.