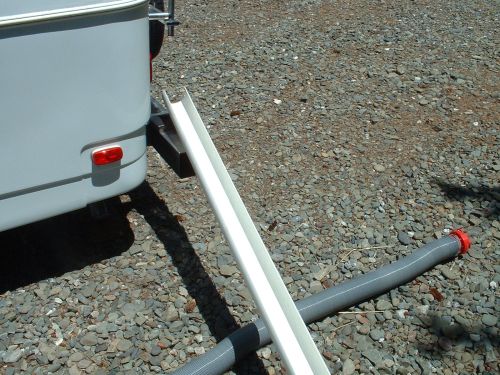
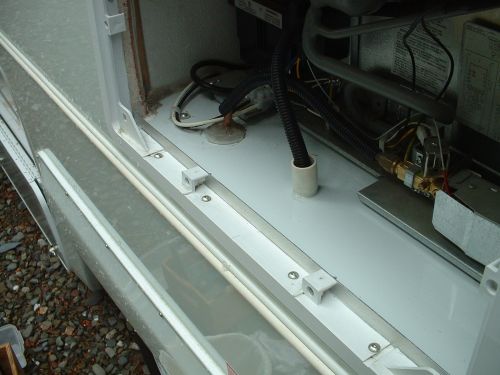
Odds & Ends


The upper cabinets are not divided between the sections so stuff at one end can be found several feet away after a day's travel.  These dividers were easy to make and keep things more or less together.  The holes were originally put in "just 'cause I could" but turned out to be handy to see what was on the other side.  Brad nail through the cloth facing with dark colored panel nails, screw to the back wall panel.

separator


refer

Inside the Dometic refrigerator there's a drip catcher under the cooling fins that is piped down and behind the unit.  It's supposed to be connected to a little hole in the outer door, but since this never stays hooked up it just drips in the back.  Here, I've drilled straight down into 
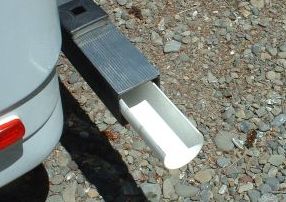
the wheel well between the wheels, installed a short length of 3/4" pvc pipe, and siliconed everything up.  The other end comes out right in the center of the wheel well. A 45 deg ell pointing to the rear should help keep mud, etc. out of the end of the pipe.
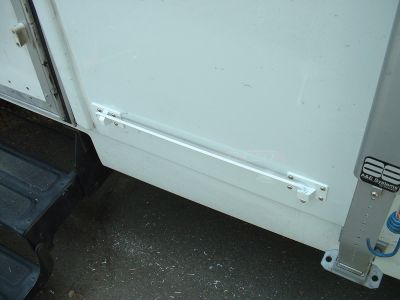
Note the addition of an aluminum strip screwed across the sill to help keep outside water from running in.

This all started when I noticed signs of water having set inside the compartment.  I suspect some of this came from spray through the louvers during a rain storm.  Looking closely at the louvered door, you can see that spray from high winds or passing trucks might blow up and into this area.

Bigfoot is plainly aware of this as the floor of the outer refer cabinet is fiberglass and everything is caulked with silicon.  Strange that Dometic hasn't come up with a more effective door. In lieu of that, Bigfoot should install a molded fiberglass pan that drains to the outside. Next project will be to work over the door to better keep the water out.


Saving th' Hose

I've seen this a couple of other places, but it bears repeating here.

After replacing a couple of sewer hoses in our first trailer, I realized that the inevitable rust that forms in the storage bumper sandpapers through the thin vinyl hose pretty quickly.  This is one solution. 

A piece of 4" pvc sewer and drain pipe provides a nice slick, nonabrasive liner for your hose to slide in.  Be sure to use the thin-walled solid pvc pipe as anything thicker may make it a tight fit for your hose.  The black ABS corrugated stuff, while very strong, does not leave enough room for the hose.

sewer 1

sewer 2

The 4 in. size tends to spread open, making it a slightly snug fit in the bumper, which is good.  I have an elbow on the end of my sewer hose so that's why the top section is missing.  The hose slides in with the elbow turned up.  Cut the S&D pipe length so the end insets a bit to allow room for the twist coupler.

By the way, that shiny aluminum cover on the bumper is likely held in place by two or more teks (self tapping screws) that might stick right into the area where your hose has to go.  You may need to remove them, depending on where exactly they were installed.  Refasten with pop rivets or teks but locate them in the corners so as to miss the liner and hose.


More Odds & Ends

roof


A "for what it's worth" picture showing the Bigfoot roof construction.  That's 1/2" plywood over 1" of styrofoam, then a fuzzy fabric covered 1/8" plywood ceiling panel.  A bit less than the 1-1/2" foam that's advertised but still around R-7 for the whole assembly.  That's more than our stick-built brethren, for sure, and very stout when walking on it. A/C mounting is no problem.


The power switch on our Atwood electronic ignition hot water heater is very difficult to see and the pilot light only comes on for a few seconds when the heater cycles on.  Here, I've added a small 12v pilot light from Radio Shack that's bright enough to catch our eye if we try to take off without shutting down the heater. This light is wired across the main power-on lead and ground so it's lit whenever the waterheater is enabled.

DHW


bath

In the bathroom, one way to make use of that funny little ledge covering up the water pipes to the shower.  Perfect place for the too-tall-to-fit-in-the-medicine cabinet things.


Holding the %#*&^% Door Open

I have no idea how this stock door holder is supposed to work.  One thing for sure, it doesn't work.  If the wind blows one way, the little plastic arm just bends in two.  If the wind blows the other way, it just disconnects.  Strange.

Because of the belly band on the Bigfoot, the door must be held 30 degrees or so from the side of the trailer. I think this is common with other molded fiberglass trailers.

The parts shown below were handmade out of aluminum and brass stuff, then painted.  The business end just bends down 1/4” and hooks into a hole in the door bracket. Always use stainless screws and pilot drill before screwing into your fiberglass.  The factory should consider doing that...

door 1

door 2

door 3

Above:
The thing stowed against the side of the trailer. It's as long as it is because I wanted as much leverage on the door as possible to protect the hinges from excessive loading.