This is a mod to the waste dump line that will make your life a lot easier. If you are the. . . um. . . “sanitation engineer” for your rig, it is one of the nicest things you can do for yourself.
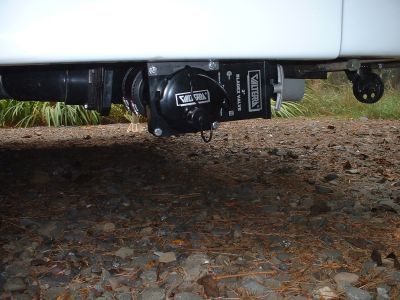
This is what it looks like from the outside. Note that the sewer connection is closer to the outside of the trailer, instead of the very hard to reach standard position. Glance down at the next picture for what's actually going on.
The first benefit is, while dry camping, the black water tank usually lags behind the gray in filling up. With this setup, you can easily divert excess gray water into your black water tank by simply opening your old gray valve, which fills up the “Y”, then opening the black. When the tanks have equalized, close the black valve, then the gray, and you've added some more gray capacity. All this happens behind the outside valve. Second, when dumping, you can give the black tank an extra flushing by dumping the black tank first, closing the outer valve, then opening the gray valve. This diverts gray water into the black tank for an extra flush. Be sure to close the gray tank before the second black tank dump.
A view from beneath.
Start by removing the stubs that your sewer hose locks onto. A hacksaw blade works fine, but don't try to cut it down completely flush with that. Leave a bit to so you can carefully file down what remains flush with rest of the fitting. You want a nice round, smooth finish.
Note that, since the black and gray water valves operate in the direction they do, you need to mount the new valve to the gray water side and far enough away so that there's room to operate the valve handle.
My RV guy said to use a standard solvent welded ABS coupling to hook up to the old sewer outlet but I chickened out. It happens that the sewer outlet diameter is a smidge smaller than 3” ABS pipe. The rubber coupling accommodates the slight difference in size and provides some adjustment room to slide things back and forth for a perfect fit.
Note that the valve handle was turned up on the rear just a bit to aid in ground clearance.
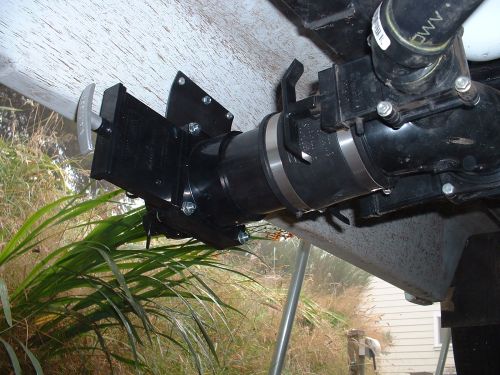
Finally, be sure to support the whole thing as shown. While the new valve and extension isn't heavy, it's not the place to have things come apart while traveling down the road. I used an aluminum bracket made from 1/16” aluminum, like cookie sheet material. The valve has two 1/4” bolts at the top that you can use to attach your bracket to. Make it wide enough so you can get three #10 stainless steel sheet metal screws across where you attach to the fiberglass skirt. Pre-drill all holes in your fiberglass and stick a dab of caulk around the hole before tightening.
Sort of related: Notice the little wheel in the first picture. That's one of two that I installed as a skid wheel. The large metal guard that normally protects the dump valves got in the way of this so I had to cut it out. It dragged on our driveway, anyway, so it was good riddance. The wheels are relatively cheap but quite sturdy hardware store units that are secured to the frame just forward of the bumper with homemade U-bolts. Much cheaper than the official heavy duty RV caliber product and good enough. If they get messed up, they're easy to replace.